스크립트 작성
[code]
$ sudo nano pitemp.sh
[/code]
5초마다 온도를 표시하는 루프문
[code]
while true
do
# get cpu temp from thermal node of kernal
cpuTemp0=$(cat /sys/class/thermal/thermal_zone0/temp)
cpuTemp1=$(($cpuTemp0/1000))
cpuTemp2=$(($cpuTemp0/100))
cpuTempM=$(($cpuTemp2 % $cpuTemp1))
# get gpu temp using Video Core Generate Command
gpuTemp=$(/opt/vc/bin/vcgencmd measure_temp)
gpuTemp=${gpuTemp//temp=/}
echo $(date "+%Y-%m-%d %H:%M:%S")" CPU: " $cpuTemp1"."$cpuTempM"'C" "GPU: "$gpuTemp
sleep 5
done
[/code]
실행파일로 만들고 실행
[code]
$ sudo chmod +x pitemp.sh
$ ./pitemp.sh
[/code]
21 Entries : Results for 개발/Linux
- Posted
- Filed under 개발/Linux


- Tag raspberry pi, 온도
- Response
- You can track responses via RSS / ATOM feed
- Posted
- Filed under 개발/Linux
* Github Repository
https://github.com/go-gitea/gitea
* git 설치
[code]
$sudo apt install git
[/code]
* gitea 디렉토리에 바이너리 다운로드
[code]
$mkdir ~/gitea
$cd ~/gitea
$wget -O gitea https://dl.gitea.io/gitea/master/gitea-master-linux-arm-6
[/code]
* MySQL 셋업
[code]
$sudo mysql -u root
CREATE DATABASE gitea;
CREATE USER 'gitea'@'localhost' IDENTIFIED BY 'password';
GRANT ALL PRIVILEGES ON gitea.* TO 'gitea'@'localhost';
FLUSH PRIVILEGES
^C
[/code]
* 서버실행
[code]
$cd ~/gitea
$chmod 755 gitea
$./gitea web
[/code]
* 접속 후 환경설정
데이터베이스 유형 : MySQL
호스트: 127.0.0.1:3306
Username: gitea
비밀번호: password
데이터베이스 이름: gitea
Charset: utf8
저장소 최상위 경로 : /home/pi/gitea/gitea-repositories
LFS Root Path : /home/pi/gitea/data/LFS
데몬 사용자 계정 : pi
도메인 : localhost
SSH 포트 :
HTTP 포트 : 3000
애플리케이션 URL : http://라즈베리파이IP:3000/
로그 경로 : /home/pi/gitea/log
* 서비스에 등록
[code]
$sudo nano /etc/systemd/system/gitea.service
[Unit]
Description=Gitea (Git with a cup of tea)
After=syslog.target
After=network.target
[Service]
# Modify these two values ??and uncomment them if you have
# repos with lots of files and get to HTTP error 500 because of that
###
# LimitMEMLOCK=infinity
# LimitNOFILE=65535
RestartSec=2s
Type=simple
User=pi
Group=pi
WorkingDirectory=/home/pi/gitea
ExecStart=/home/pi/gitea/gitea web
Restart=always
Environment=USER=pi
HOME=/home/pi
[Install]
WantedBy=multi-user.target
[/code]
* 서비스 시작
[code]
sudo systemctl enable gitea.service
sudo systemctl start gitea.service
[/code]
* gitea nginx 설정
[code]
$sudo nano /etc/nginx/sites-available/git.qualitybits.net
server {
listen 443 ssl;
server_name 도메인;
ssl_certificate /etc/letsencrypt/live/도메인/fullchain.pem;
ssl_certificate_key /etc/letsencrypt/live/도메인/privkey.pem;
location / {
client_max_body_size 364M;
proxy_pass http://localhost:3000;
proxy_connect_timeout 600;
proxy_send_timeout 600;
proxy_read_timeout 600;
send_timeout 600;
proxy_set_header X-Real-IP $remote_addr;
}
}
server {
listen 80;
server_name 도메인;
return 301 https://$server_name$request_uri;
}
[/code]
* 심볼릭링크 작성
[code]
$sudo ln -s /etc/nginx/sites-available/도메인 /etc/nginx/sites-enabled/도메인
[/code]
* SSL 인증서 취득
[code]
$sudo systemctl stop nginx
$sudo certbot certonly --standalone -d 도메인
$sudo systemctl start nginx
[/code]
* 업데이트
[code]
$sudo systemctl stop gitea.service
$mv -f /home/pi/gitea/gitea /home/pi/gitea/gitea.old
$wget -O /home/pi/gitea/gitea https://dl.gitea.io/gitea/master/gitea-master-linux-arm-6
$chmod +x /home/pi/gitea/gitea
$sudo systemctl start gitea.service
[/code]
* 인증서 갱신
[code]
$ sudo systemctl stop nginx
$ sudo certbot renew
$ sudo systemctl start nginx
[/code]
* 데이터 백업
[code]
# login as your database user, for me it is root
$ su -
# navigate to your gitea folder
$ cd /home/USER/gitea
# run the dump command
$ ./gitea dump -V -t /media/USER/USB/
[/code]
* 데이터 복구
[code]
apt-get install gitea
unzip gitea-dump-1482906742.zip
cd gitea-dump-1482906742
mv custom/conf/app.ini /etc/gitea/conf/app.ini # or mv app.ini /etc/gitea/conf/app.ini
unzip gitea-repo.zip
mv gitea-repo/* /home/pi/gitea/gitea-repositories/
chown -R gitea:gitea /etc/gitea/conf/app.ini /home/pi/gitea/gitea-repositories/
mysql -u$USER -p$PASS $DATABASE <gitea-db.sql
# or sqlite3 $DATABASE_PATH <gitea-db.sql
service gitea restart
[/code]
- Tag git, gitea, linux, raspberry pi
- Response
- You can track responses via RSS / ATOM feed
- Posted
- Filed under 개발/Linux
* Github
https://github.com/RestyaPlatform/board
* 인스톨 스크립트 다운로드 후 설치
[code]
$ sudo su
$ wget https://github.com/RestyaPlatform/board/raw/master/restyaboard.sh –no-check-certificate
$ chmod +x restyaboard.sh
$ ./restyaboard.sh
[/code]
* nginx 가상호스트 설정
[code]
$ cp /usr/share/nginx/html/restyaboard.conf /etc/nginx/sites-available/도메인명
$ $sudo ln -s /etc/nginx/sites-available/도메인 /etc/nginx/sites-enabled/도메인명
[/code]
* nginx 서버설정
[code]
server {
listen 80;
server_name 도메인명;
root /usr/share/nginx/html;
index index.html index.php;
gzip on;
gzip_disable "msie6";
gzip_comp_level 6;
# gzip_comp_level 9;
gzip_min_length 1100;
gzip_buffers 16 8k;
gzip_proxied any;
# gzip_http_version 1.1;
gzip_types text/plain application/xml text/css text/js text/xml application/x-javascript text/javascript application/json application/xml+rss;
client_max_body_size 300M;
rewrite ^/oauth/authorize$ /server/php/authorize.php last;
rewrite ^/oauth_callback/([a-zA-Z0-9_\.]*)/([a-zA-Z0-9_\.]*)$ /server/php/oauth_callback.php?plugin=$1&code=$2 last;
rewrite ^/download/([0-9]*)/([a-zA-Z0-9_\.]*)$ /server/php/download.php?id=$1&hash=$2 last;
rewrite ^/ical/([0-9]*)/([0-9]*)/([a-z0-9]*).ics$ /server/php/ical.php?board_id=$1&user_id=$2&hash=$3 last;
rewrite ^/api/(.*)$ /server/php/R/r.php?_url=$1&$args last;
rewrite ^/api_explorer/api-docs/$ /client/api_explorer/api-docs/index.php last;
location / {
root /usr/share/nginx/html/client;
}
location ~ \.php$ {
try_files $uri =404;
include fastcgi_params;
fastcgi_pass unix:/run/php/php7.2-fpm.sock;
fastcgi_index index.php;
fastcgi_param SCRIPT_FILENAME $document_root$fastcgi_script_name;
fastcgi_param PHP_VALUE "upload_max_filesize=9G \n post_max_size=9G \n max_execution_time=200 \n max_input_time=200 \n memory_limit=256M";
}
location ~* \.(css|js|less|html|ttf|woff|jpg|jpeg|gif|png|bmp|ico|pdf|doc|docx|xls|xlx|txt|ppt|pptx|mp4|webm|mkv|wmv|avi|mp3) {
root /usr/share/nginx/html/client;
if (-f $request_filename) {
break;
}
rewrite ^/img/([a-zA-Z_]*)/([a-zA-Z_]*)/([a-zA-Z0-9_\.]*)$ /server/php/image.php?size=$1&model=$2&filename=$3 last;
add_header Cache-Control public;
add_header Cache-Control must-revalidate;
expires 7d;
}
}
[/code]
* SSL 인증서 발행
[code]
$sudo systemctl stop nginx
$sudo certbot certonly --standalone -d 도메인
$sudo systemctl start nginx
[/code]
* nginx SSL 설정
[code]
server {
listen 80;
server_name 도메인명;
return 301 https://$server_name$request_uri;
}
server {
listen 443 ssl;
server_name 도메인명;
ssl_certificate /etc/letsencrypt/live/도메인명/fullchain.pem;
ssl_certificate_key /etc/letsencrypt/live/도메인명/privkey.pem;
ssl_session_cache shared:SSL:1m;
ssl_session_timeout 15m;
# Set system wide SSL settings
ssl_prefer_server_ciphers on;
ssl_protocols TLSv1.2 TLSv1.1 TLSv1;
#Forward Secrecy
ssl_ciphers "EECDH+ECDSA+AESGCM EECDH+aRSA+AESGCM EECDH+ECDSA+SHA384 EECDH+ECDSA+SHA256 EECDH+aRSA+SHA384 EECDH+aRSA+SHA256 EECDH+aRSA+RC4 EECDH EDH+aRSA RC4 !aNULL !eNULL !LOW !3DES !MD5 !EXP !PSK !SRP !DSS";
if ($scheme = 'http') {
rewrite ^/(.*)$ https://도메인명/$1 permanent;
}
root /usr/share/nginx/html;
index index.html index.php;
gzip on;
gzip_disable "msie6";
gzip_comp_level 6;
# gzip_comp_level 9;
gzip_min_length 1100;
gzip_buffers 16 8k;
gzip_proxied any;
# gzip_http_version 1.1;
gzip_types text/plain application/xml text/css text/js text/xml application/x-javascript text/javascript application/json application/xml+rss;
client_max_body_size 300M;
rewrite ^/oauth/authorize$ /server/php/authorize.php last;
rewrite ^/oauth_callback/([a-zA-Z0-9_\.]*)/([a-zA-Z0-9_\.]*)$ /server/php/oauth_callback.php?plugin=$1&code=$2 last;
rewrite ^/download/([0-9]*)/([a-zA-Z0-9_\.]*)$ /server/php/download.php?id=$1&hash=$2 last;
rewrite ^/ical/([0-9]*)/([0-9]*)/([a-z0-9]*).ics$ /server/php/ical.php?board_id=$1&user_id=$2&hash=$3 last;
rewrite ^/api/(.*)$ /server/php/R/r.php?_url=$1&$args last;
rewrite ^/api_explorer/api-docs/$ /client/api_explorer/api-docs/index.php last;
location / {
root /usr/share/nginx/html/client;
}
location ~ \.php$ {
try_files $uri =404;
include fastcgi_params;
fastcgi_pass unix:/run/php/php7.2-fpm.sock;
fastcgi_index index.php;
fastcgi_param SCRIPT_FILENAME $document_root$fastcgi_script_name;
fastcgi_param PHP_VALUE "upload_max_filesize=9G \n post_max_size=9G \n max_execution_time=200 \n max_input_time=200 \n memory_limit=256M";
}
location ~* \.(css|js|less|html|ttf|woff|jpg|jpeg|gif|png|bmp|ico|pdf|doc|docx|xls|xlx|txt|ppt|pptx|mp4|webm|mkv|wmv|avi|mp3) {
root /usr/share/nginx/html/client;
if (-f $request_filename) {
break;
}
rewrite ^/img/([a-zA-Z_]*)/([a-zA-Z_]*)/([a-zA-Z0-9_\.]*)$ /server/php/image.php?size=$1&model=$2&filename=$3 last;
add_header Cache-Control public;
add_header Cache-Control must-revalidate;
expires 7d;
}
}
[/code]
- Tag debian, kanban, raspberry pi, restyaboard
- Response
- You can track responses via RSS / ATOM feed
- Posted
- Filed under 개발/Linux
https://stackframe.tistory.com/4
라즈베리파이에서 11버전 설치
$ sudo apt-get install postgresql-11
9.6 버전에서 11버전으로 데이터 이전
$ sudo pg_upgradecluster 9.6 main
old 클러스터 삭제
$ sudo pg_dropcluster 9.6 main
라즈베리파이에서 11버전 설치
$ sudo apt-get install postgresql-11
9.6 버전에서 11버전으로 데이터 이전
$ sudo pg_upgradecluster 9.6 main
old 클러스터 삭제
$ sudo pg_dropcluster 9.6 main
- Tag postgresql, raspberry pi, upgrade
- Response
- You can track responses via RSS / ATOM feed
- Posted
- Filed under 개발/Linux
모듈 업데이트
$ sudo apt-get update && sudo apt-get upgrade -y
에러가 없는지 확인
$ dpkg -C
$ apt-mark showhold
apt-get 소스를 Buster로 변경
$ sudo sed -i 's/stretch/buster/g' /etc/apt/sources.list
$ sudo sed -i 's/stretch/buster/g' /etc/apt/sources.list.d/raspi.list
아직 변경되지 않은 소스가 있는지 확인. 있으면 위의 줄처럼 변경해줌
$ grep -lnr stretch /etc/apt
list change packge를 없애서 처리를 빠르게 함
$ sudo apt-get remove apt-listchanges
커널 및 패키지 업그레이드
$ sudo apt-get update && sudo apt-get upgrade -y
오래된 패키지 제거
$ sudo apt-get autoremove -y && sudo apt-get autoclean
설치 확인
$ cat /etc/os-release
커널 넘버 확인
$ sudo dpkg -l | grep raspberry
$ sudo apt-get update && sudo apt-get upgrade -y
에러가 없는지 확인
$ dpkg -C
$ apt-mark showhold
apt-get 소스를 Buster로 변경
$ sudo sed -i 's/stretch/buster/g' /etc/apt/sources.list
$ sudo sed -i 's/stretch/buster/g' /etc/apt/sources.list.d/raspi.list
아직 변경되지 않은 소스가 있는지 확인. 있으면 위의 줄처럼 변경해줌
$ grep -lnr stretch /etc/apt
list change packge를 없애서 처리를 빠르게 함
$ sudo apt-get remove apt-listchanges
커널 및 패키지 업그레이드
$ sudo apt-get update && sudo apt-get upgrade -y
오래된 패키지 제거
$ sudo apt-get autoremove -y && sudo apt-get autoclean
설치 확인
$ cat /etc/os-release
커널 넘버 확인
$ sudo dpkg -l | grep raspberry
- Tag raspberry pi, upgrade
- Response
- You can track responses via RSS / ATOM feed
- Posted
- Filed under 개발/Linux
* 다음 웹페이지를 보고 따라해보면서 마지막까지 트러블 없이 완료. 나에게 맞게 명령을 수정하면서 수행했던 내용을 기록하는 의미에서 포스팅한다.
How to setup Taiga project management platform on Raspberry Pi 3 with Raspbian Stretch Lite
https://www.techcoil.com/blog/how-to-setup-taiga-project-management-platform-on-raspberry-pi-3-with-raspbian-stretch-lite/
[기본설정 준비]
* 필요패키지 설치
$ sudo apt-get install build-essential binutils-doc autoconf flex bison libjpeg-dev libfreetype6-dev zlib1g-dev libzmq3-dev libgdbm-dev libncurses5-dev automake libtool libffi-dev curl git tmux gettext rabbitmq-server redis-server nginx supervisor postgresql postgresql-contrib postgresql-doc postgresql-server-dev-9.6 python-dev libxml2-dev libxslt-dev libssl-dev libffi-dev libopenjp2-7-dev virtualenv
* 시스템유저 taiga 작성 후 로그인
$ sudo adduser taiga
$ sudo adduser taiga sudo
$ sudo su taiga
$ cd ~
* PostgreSQL 설정을 위한 리눅스 로케일 확인
$ locale -a
* PostgreSQL 유저및 DB생성
$ sudo -u postgres createuser taiga
$ sudo -u postgres createdb taiga -O taiga --encoding='utf-8' --locale=en_GB.utf8 --template=template0
* RabbitMQ 유저및 가상호스트 생성
$ sudo rabbitmqctl add_user taiga PASSWORD_FOR_EVENTS
$ sudo rabbitmqctl add_vhost taiga
$ sudo rabbitmqctl set_permissions -p taiga taiga ".*" ".*" ".*"
* 로그폴더 생성
$ mkdir -p ~/logs
[타이가 백엔드 셋업]
* 타이가 최신 백엔드 다운로드
$ cd ~
$ git clone https://github.com/taigaio/taiga-back.git taiga-back
$ cd taiga-back
$ git checkout stable
* 타이가 백엔드에서 사용할 Python3 용 가상환경 생성
$ cd ~
$ virtualenv -p python3 taiga-back_env
* Python3용 타이가 백엔드 의존 패키지 설치
$ cd ~
$ source taiga-back_env/bin/activate
$ cd taiga-back
$ pip install -r requirements.txt
* 디렉토리는 이동하지 말고 동일 디렉토리에서 백엔드 데이터베이스 초기화
$ python manage.py migrate --noinput
$ python manage.py loaddata initial_user
$ python manage.py loaddata initial_project_templates
$ python manage.py compilemessages
$ python manage.py collectstatic --noinput
이 조작으로 admin/123123 이라는 계정이 생성된다
* 초기설정파일 작성. 예를 들어 라즈베리파이의 IP는 192.168.0.25라 한다.
$ sudo nano ~/taiga-back/settings/local.py
[code]
from .common import *
MEDIA_URL = "http://192.168.0.25/media/"
STATIC_URL = "http://192.168.0.25/static/"
SITES["front"]["scheme"] = "http"
SITES["front"]["domain"] = "192.168.0.25"
SECRET_KEY = "theveryultratopsecretkey"
DEBUG = False
PUBLIC_REGISTER_ENABLED = False
DEFAULT_FROM_EMAIL = "no-reply@192.168.0.25"
SERVER_EMAIL = DEFAULT_FROM_EMAIL
#CELERY_ENABLED = True
EVENTS_PUSH_BACKEND = "taiga.events.backends.rabbitmq.EventsPushBackend"
EVENTS_PUSH_BACKEND_OPTIONS = {"url": "amqp://taiga:PASSWORD_FOR_EVENTS@localhost:5672/taiga"}
# Uncomment and populate with proper connection parameters
# for enable email sending. EMAIL_HOST_USER should end by @domain.tld
#EMAIL_BACKEND = "django.core.mail.backends.smtp.EmailBackend"
#EMAIL_USE_TLS = False
#EMAIL_HOST = "localhost"
#EMAIL_HOST_USER = ""
#EMAIL_HOST_PASSWORD = ""
#EMAIL_PORT = 25
# Uncomment and populate with proper connection parameters
# for enable github login/singin.
#GITHUB_API_CLIENT_ID = "yourgithubclientid"
#GITHUB_API_CLIENT_SECRET = "yourgithubclientsecret"
[/code]
* 백엔드 인스톨 검증
$ source ~/taiga-back_env/bin/activate
$ python ~/taiga-back/manage.py runserver
그러면 taiga 계정에서 서버가 시작되므로 putty등으로 추가적인 SSH 세션을 열어서 파이에 접속한다
$ ssh pi@192.168.0.25
그 후 추가 SSH 세션에서 다음 명령으로 서버가 응답하는지 확인한다. http://localhost:8000/api/v1/으로 시작하는 JSON 리스트를 받으면 성공이다.
$ curl -0 http://localhost:8000/api/v1/
서버응답을 확인했으면 SSH 세션을 닫고 컨트롤+C로 타이가 백엔드를 중지시킨다.
[타이가 프론트엔드 셋업]
* 타이가 프론트엔드 다운로드
$ cd ~
$ git clone https://github.com/taigaio/taiga-front-dist.git taiga-front-dist
$ cd taiga-front-dist
$ git checkout stable
설정파일을 작성한뒤 다음과 같이 수정한다.
$ cp ~/taiga-front-dist/dist/conf.example.json ~/taiga-front-dist/dist/conf.json
$ sudo nano ~/taiga-front-dist/dist/conf.json
[code]
{
"api": "http://192.168.0.25/api/v1/",
"eventsUrl": "ws://192.168.0.25/events",
"eventsMaxMissedHeartbeats": 5,
"eventsHeartbeatIntervalTime": 60000,
"eventsReconnectTryInterval": 10000,
"debug": true,
"debugInfo": false,
"defaultLanguage": "en",
"themes": ["taiga"],
"defaultTheme": "taiga",
"publicRegisterEnabled": false,
"feedbackEnabled": true,
"supportUrl": "https://tree.taiga.io/support",
"privacyPolicyUrl": null,
"termsOfServiceUrl": null,
"maxUploadFileSize": null,
"contribPlugins": [],
"tribeHost": null,
"importers": [],
"gravatar": true
"rtlLanguages": ["fa"]
}
[/code]
[타이가 이벤트 세팅]
Taiga-events는 웹소켓 서버로, 타이가 프론트엔드가 백로그, 태스크보드, 칸반, 이슈리스팅의 변경을 리얼타임으로 보여줄 수 있게 한다. 이 서버는 RabbitMQ를 메시지 브로커로 이용한다.
* 타이가 이벤트 다운로드
$ cd ~
$ git clone https://github.com/taigaio/taiga-events.git taiga-events
$ cd taiga-events
* nodejs 인스톨
$ curl -sL https://deb.nodesource.com/setup_6.x | sudo -E bash -
$ sudo apt-get install -y nodejs
* npm이 같이 안깔릴 경우
$ sudo apt-get install npm
$ sudo npm install -g npm@latest
* 자바스크립트 의존모듈 인스톨
$ npm install
$ sudo npm install -g coffee-script
* 타이가 이벤트 환경설정파일 작성
$ cp config.example.json config.json
$ sudo nano config.json
[code]
{
"url": "amqp://taiga:PASSWORD_FOR_EVENTS@localhost:5672/taiga",
"secret": "theveryultratopsecretkey",
"webSocketServer": {
"port": 8888
}
}
[/code]
"secret"의 키 내용은 ~/taiga-back/settings/local.py 에 작성한 "SECRET_KEY"와 동일해야 한다.
[슈퍼바이저에게 타이가 백엔드와 타이가 이벤트를 실행하도록 설정]
Supervisor라는 프로세스 컨트롤 시스템이 타이가 백엔드와 타이가 이벤트를 계속 실행하도록 설정한다.
* 슈퍼바이저가 타이가 백엔드를 실행하도록 구성
다음과 같은 내용의 배시파일을 작성한다.
$ nano ~/run_taiga_backend.sh
[code]
#!/bin/bash
source taiga-back_env/bin/activate
gunicorn -w 3 -t 60 --pythonpath=./taiga-back -b 127.0.0.1:8001 taiga-back.taiga.wsgi
deactivate
[/code]
유저 taiga가 실행할 수 있도록 퍼미션 변경
$ sudo chmod u+x ~/run_taiga_backend.sh
다음과 같은 내용의 슈퍼바이저 환경설정파일을 작성.
$ sudo nano /etc/supervisor/conf.d/taiga-back.conf
[code]
[program:taiga-back]
directory=/home/taiga
command=/bin/bash -E -c ./run_taiga_backend.sh
autostart=true
autorestart=true
stopsignal=INT
stopasgroup=true
killasgroup=true
stdout_logfile=/home/taiga/logs/taiga-back.stdout.log
stderr_logfile=/home/taiga/logs/taiga-back.stderr.log
user=taiga
[/code]
* 슈퍼바이저가 타이가이벤트를 실행하도록 설정
다음과 같은 내용의 설정파일을 작성한다.
$ sudo nano /etc/supervisor/conf.d/taiga-events.conf
[code]
[program:taiga-events]
directory=/home/taiga/taiga-events
command=/usr/bin/coffee index.coffee
autostart=true
autorestart=true
stopsignal=INT
stopasgroup=true
killasgroup=true
stdout_logfile=/home/taiga/logs/taiga-events.stdout.log
stderr_logfile=/home/taiga/logs/taiga-events.stderr.log
user=taiga
[/code]
* 슈퍼바이저를 재시작
sudo systemctl restart supervisor.service
[Nginx가 타이가 프론트엔드, 백엔드, 이벤트를 관할하도록 설정]
다음과 같은 내용의 Nginx 가상호스트 설정파일을 작성
$ sudo nano /etc/nginx/sites-available/taiga.conf
[code]
server {
listen 80 default_server;
server_name _;
large_client_header_buffers 4 32k;
client_max_body_size 50M;
charset utf-8;
access_log /home/taiga/logs/nginx.access.log;
error_log /home/taiga/logs/nginx.error.log;
# Frontend
location / {
root /home/taiga/taiga-front-dist/dist/;
try_files $uri $uri/ /index.html;
}
# Backend
location /api {
include proxy_params;
proxy_set_header X-Scheme $scheme;
proxy_pass http://127.0.0.1:8001/api;
proxy_redirect off;
}
# Django admin access (/admin/)
location /admin {
include proxy_params;
proxy_set_header X-Scheme $scheme;
proxy_pass http://127.0.0.1:8001$request_uri;
proxy_redirect off;
}
# Static files
location /static {
alias /home/taiga/taiga-back/static;
}
# Media files
location /media {
alias /home/taiga/taiga-back/media;
}
# Taiga-events
location /events {
proxy_pass http://127.0.0.1:8888/events;
proxy_http_version 1.1;
proxy_set_header Upgrade $http_upgrade;
proxy_set_header Connection "upgrade";
proxy_connect_timeout 7d;
proxy_send_timeout 7d;
proxy_read_timeout 7d;
}
}
[/code]
* sites-enabled 디렉토리에 가상호스트 설정파일의 심볼릭링크를 생성한다
$ sudo ln -s /etc/nginx/sites-available/taiga.conf /etc/nginx/sites-enabled/taiga.conf
* Nginx 서버 재시작
$ sudo systemctl restart nginx.service
[타이가를 외부에서 접속하기]
현재 상태에서 타이가는 192.168.0.25 IP로 내부내트워크에서 밖에 접속할 수 없다. yourdomain.com 이라는 도메인을 구입해서 사용하고 있고 taiga.yourdomain.com 이라는 주소로 타이가를 연결해서 사용해 보기로 한다.
* 타이가의 Nginx용 설정파일을 가상호스트용으로 바꾸고 다음과 같이 내용을 수정한다.
$ sudo mv /etc/nginx/sites-available/taiga.conf /etc/nginx/sites-available/taiga.yourdomain.com.conf
[code]
server {
listen 80;
server_name taiga.yourdomain.com;
large_client_header_buffers 4 32k;
client_max_body_size 50M;
charset utf-8;
access_log /home/taiga/logs/nginx.access.log;
error_log /home/taiga/logs/nginx.error.log;
# For ACME challenge
location ~ /.well-known {
root /home/taiga;
allow all;
}
# Frontend
location / {
root /home/taiga/taiga-front-dist/dist/;
try_files $uri $uri/ /index.html;
}
# Backend
location /api {
include proxy_params;
proxy_set_header X-Scheme $scheme;
proxy_pass http://127.0.0.1:8001/api;
proxy_redirect off;
}
# Django admin access (/admin/)
location /admin {
include proxy_params;
proxy_set_header X-Scheme $scheme;
proxy_pass http://127.0.0.1:8001$request_uri;
proxy_redirect off;
}
# Static files
location /static {
alias /home/taiga/taiga-back/static;
}
# Media files
location /media {
alias /home/taiga/taiga-back/media;
}
# Taiga-events
location /events {
proxy_pass http://127.0.0.1:8888/events;
proxy_http_version 1.1;
proxy_set_header Upgrade $http_upgrade;
proxy_set_header Connection "upgrade";
proxy_connect_timeout 7d;
proxy_send_timeout 7d;
proxy_read_timeout 7d;
}
}
[/code]
* 기존의 심볼릭링크를 삭제하고 새로운 파일에 대한 심볼릭링크를 작성한다
$ sudo rm /etc/nginx/sites-enabled/taiga.conf
$ sudo ln -s /etc/nginx/sites-available/taiga.yourdomain.com.conf /etc/nginx/sites-enabled/taiga.yourdomain.com.conf
* Nginx 서버를 재시작하면 이제 타이가는 http://taiga.yourdomain.com으로 접속할 수 있고, SSL 인증에 대한 ACME challenge를 통과할 수 있게 된다.
$ sudo systemctl restart nginx.service
[Lets's Encrypt의 인증서를 이용하여 HTTPS 프로토콜로 변경]
* SSL 인증서를 취득
$ sudo apt-get install letsencrypt
$ sudo certbot certonly --webroot --webroot-path=/home/taiga
-d taiga.yourdomain.com
* Diffie-Hellman group 생성
Nginx가 클라이언트와 암호화키를 주고받을 수 있도록 Diffie-Hellman group을 생성
$ sudo openssl dhparam -out /etc/ssl/certs/dhparam.pem 2048
* Nginx 설정파일을 다음과 같이 변경한다
$ sudo nano /etc/nginx/sites-enabled/taiga.yourdomain.com.conf
[code]
server {
listen 80;
server_name taiga.yourdomain.com;
return 301 https://$host$request_uri;
}
# For ssl
server {
ssl on;
ssl_certificate /etc/letsencrypt/live/taiga.yourdomain.com/fullchain.pem;
ssl_certificate_key /etc/letsencrypt/live/taiga.yourdomain.com/privkey.pem;
ssl_protocols TLSv1 TLSv1.1 TLSv1.2;
ssl_prefer_server_ciphers on;
ssl_dhparam /etc/ssl/certs/dhparam.pem;
ssl_ciphers 'ECDHE-RSA-AES128-GCM-SHA256:ECDHE-ECDSA-AES128-GCM-SHA256:ECDHE-RSA-AES256-GCM-SHA384:ECDHE-ECDSA-AES256-GCM-SHA384:DHE-RSA-AES128-GCM-SHA256:DHE-DSS-AES128-GCM-SHA256:kEDH+AESGCM:ECDHE-RSA-AES128-SHA256:ECDHE-ECDSA-AES128-SHA256:ECDHE-RSA-AES128-SHA:ECDHE-ECDSA-AES128-SHA:ECDHE-RSA-AES256-SHA384:ECDHE-ECDSA-AES256-SHA384:ECDHE-RSA-AES256-SHA:ECDHE-ECDSA-AES256-SHA:DHE-RSA-AES128-SHA256:DHE-RSA-AES128-SHA:DHE-DSS-AES128-SHA256:DHE-RSA-AES256-SHA256:DHE-DSS-AES256-SHA:DHE-RSA-AES256-SHA:AES128-GCM-SHA256:AES256-GCM-SHA384:AES128-SHA256:AES256-SHA256:AES128-SHA:AES256-SHA:AES:CAMELLIA:DES-CBC3-SHA:!aNULL:!eNULL:!EXPORT:!DES:!RC4:!MD5:!PSK:!aECDH:!EDH-DSS-DES-CBC3-SHA:!EDH-RSA-DES-CBC3-SHA:!KRB5-DES-CBC3-SHA';
ssl_session_timeout 1d;
ssl_session_cache shared:SSL:50m;
ssl_stapling on;
ssl_stapling_verify on;
add_header Strict-Transport-Security max-age=15768000;
default_type application/octet-stream;
listen 443;
server_name taiga.yourdomain.com;
access_log /home/taiga/logs/nginx.access.log;
error_log /home/taiga/logs/nginx.error.log;
# For ACME challenge
location ~ /.well-known {
root /home/taiga;
allow all;
}
# Frontend
location / {
root /home/taiga/taiga-front-dist/dist/;
try_files $uri $uri/ /index.html;
}
# Backend
location /api {
include proxy_params;
proxy_set_header X-Scheme $scheme;
proxy_pass http://127.0.0.1:8001/api;
proxy_redirect off;
}
# Django admin access (/admin/)
location /admin {
include proxy_params;
proxy_set_header X-Scheme $scheme;
proxy_pass http://127.0.0.1:8001$request_uri;
proxy_redirect off;
}
# Static files
location /static {
alias /home/taiga/taiga-back/static;
}
# Media files
location /media {
alias /home/taiga/taiga-back/media;
}
# Taiga-events
location /events {
proxy_pass http://127.0.0.1:8888/events;
proxy_http_version 1.1;
proxy_set_header Upgrade $http_upgrade;
proxy_set_header Connection "upgrade";
proxy_connect_timeout 7d;
proxy_send_timeout 7d;
proxy_read_timeout 7d;
}
}
[/code]
* Nginx를 재시작한다
$ sudo systemctl restart nginx.service
[새로운 URL 세팅에 대해 타이가 프론트엔드와 백엔드의 설정변경]
* 백엔드의 설정을 다음과 같이 변경한다
$ sudo nano ~/taiga-back/settings/local.py
[code]
from .common import *
MEDIA_URL = "https://taiga.yourdomain.com/media/"
STATIC_URL = "https://taiga.yourdomain.com/static/"
SITES["front"]["scheme"] = "https"
SITES["front"]["domain"] = "taiga.yourdomain.com"
SECRET_KEY = "theveryultratopsecretkey"
DEBUG = False
PUBLIC_REGISTER_ENABLED = False
DEFAULT_FROM_EMAIL = "no-reply@example.com"
SERVER_EMAIL = DEFAULT_FROM_EMAIL
#CELERY_ENABLED = True
EVENTS_PUSH_BACKEND = "taiga.events.backends.rabbitmq.EventsPushBackend"
EVENTS_PUSH_BACKEND_OPTIONS = {"url": "amqp://taiga:PASSWORD_FOR_EVENTS@localhost:5672/taiga"}
# Uncomment and populate with proper connection parameters
# for enable email sending. EMAIL_HOST_USER should end by @domain.tld
#EMAIL_BACKEND = "django.core.mail.backends.smtp.EmailBackend"
#EMAIL_USE_TLS = False
#EMAIL_HOST = "localhost"
#EMAIL_HOST_USER = ""
#EMAIL_HOST_PASSWORD = ""
#EMAIL_PORT = 25
# Uncomment and populate with proper connection parameters
# for enable github login/singin.
#GITHUB_API_CLIENT_ID = "yourgithubclientid"
#GITHUB_API_CLIENT_SECRET = "yourgithubclientsecret"
[/code]
* 프론트엔드의 설정을 다음과 같이 변경한다
$ sudo nano ~/taiga-front-dist/dist/conf.json
[code]
{
"api": "https://taiga.yourdomain.com/api/v1/",
"eventsUrl": "wss://taiga.yourdomain.com/events",
"eventsMaxMissedHeartbeats": 5,
"eventsHeartbeatIntervalTime": 60000,
"eventsReconnectTryInterval": 10000,
"debug": true,
"debugInfo": false,
"defaultLanguage": "en",
"themes": ["taiga"],
"defaultTheme": "taiga",
"publicRegisterEnabled": false,
"feedbackEnabled": true,
"supportUrl": "https://tree.taiga.io/support",
"privacyPolicyUrl": null,
"termsOfServiceUrl": null,
"maxUploadFileSize": null,
"contribPlugins": [],
"tribeHost": null,
"importers": [],
"gravatar": true
}
[/code]
* 슈퍼바이저를 재시작하면 https로 접속되는것을 확인할 수 있다.
$ sudo systemctl restart supervisor.service
[타이가에서 email 통지를 보낼수 있도록 설정]
* Postfix를 설치한다
$ sudo apt-get install -y postfix
* Postfix 설치시 팝업에 대해서는 다음과 같이 입력한다
Genaral type of mail configuration: Internet Site
System mail name: taiga.yourdomain.com
* 타이가 백엔드 설정을 다음과 같이 변경한다
$ sudo nano ~/taiga-back/settings/local.py
[code]
from .common import *
MEDIA_URL = "https://taiga.yourdomain.com/media/"
STATIC_URL = "https://taiga.yourdomain.com/static/"
SITES["front"]["scheme"] = "https"
SITES["front"]["domain"] = "taiga.yourdomain.com"
SECRET_KEY = "theveryultratopsecretkey"
DEBUG = False
PUBLIC_REGISTER_ENABLED = False
DEFAULT_FROM_EMAIL = "no-reply@taiga.yourdomain.com"
SERVER_EMAIL = DEFAULT_FROM_EMAIL
#CELERY_ENABLED = True
EVENTS_PUSH_BACKEND = "taiga.events.backends.rabbitmq.EventsPushBackend"
EVENTS_PUSH_BACKEND_OPTIONS = {"url": "amqp://taiga:PASSWORD_FOR_EVENTS@localhost:5672/taiga"}
# Uncomment and populate with proper connection parameters
# for enable email sending. EMAIL_HOST_USER should end by @domain.tld
EMAIL_BACKEND = "django.core.mail.backends.smtp.EmailBackend"
EMAIL_USE_TLS = False
EMAIL_HOST = "localhost"
EMAIL_HOST_USER = ""
EMAIL_HOST_PASSWORD = ""
EMAIL_PORT = 25
# Uncomment and populate with proper connection parameters
# for enable github login/singin.
#GITHUB_API_CLIENT_ID = "yourgithubclientid"
[/code]
* 슈퍼바이저를 재시작한다
$ sudo systemctl restart supervisor.service
[업데이트]
* taiga 유저로그인
$ sudo su taiga
* 프론트엔드 업데이트
$ cd ~/taiga-front-dist
$ git checkout stable
$ git pull
* 백엔드 업데이트
$ cd ~/taiga-back
$ git checkout stable
$ git pull
* 백엔드 파이썬패키지 업데이트
$ cd ~
$ source taiga-back_env/bin/activate
$ cd taiga-back
$ pip install -r requirements.txt
* 디렉토리는 이동하지 말고 동일 디렉토리에서 백엔드 데이터베이스 리셋
$ python manage.py migrate --noinput
$ python manage.py compilemessages
$ python manage.py collectstatic --noinput
* 프로세스 매니저 리셋
$ sudo systemctl restart supervisor.service
$ sudo systemctl restart nginx.service
- Tag raspberry pi, taiga.io
- Response
- You can track responses via RSS / ATOM feed
- Posted
- Filed under 개발/Linux
Let's encrypt는 사용자에게 무료로 TLS 인증서를 발급해주는 비영리기관이다. 루트 도메인, 서브 도메인, 와일드카드 서브 도메인 등에 대한 인증서 발급이 가능하다.
발급된 인증서의 유효기간은 90일이며 만료 30일 전부터 갱신할 수 있으며 갱신가능 횟수는 무제한이다.
Let's encrypt가 인증서를 발급하는 방식에는 standalone, webroot, dns 세가지가 있는데 여기서는 webroot 명령어를 이용하여 발급한다.
webroot 명령어를 이용하면 자신의 웹서버에서 작동중인 http 프로토콜의 웹사이트에 certbot이 접속하여 서버가 유효한지 확인하고 인증서를 발급한다.
현재 Nginx에서 http://www.test.com이라는 웹사이트를 운영중이고 Nginx 설정은 다음과 같다고 하자.
[code]
server {
listen 80;
listen [::]:80;
server_name www.test.com;
root /var/www/html;
index index.html index.htm index.php;
location / {
try_files $uri $uri/ =404;
}
location ~ \.php$ {
include snippets/fastcgi-php.conf;
fastcgi_pass unix:/var/run/php/php7.0-fpm.sock;
}
}
[/code]
* certbot 패키지를 설치하고 인증서를 발급한다.
$ sudo apt-get install certbot
$ sudo certbot certonly --webroot --webroot-path=/var/www/html
-d www.test.com
* 발급받은 인증서는 /etc/letsencrypt/live/[인증서이름] 에 저장된다.
cert.pem - 인증서 파일
chain.pem - 인증서 발급자 파일
fullchain.pem - cert.pem 과 chain.pen 을 하나로 합쳐놓은 파일
privkey.pem - 인증암호를 해독하는 개인키
Apache2 서버에서는 cert.pem, chain.pem, privkey.pem 을,
Nginx 서버에서는 fullchain.pem, privkey.pem 을 사용한다.
* Nginx의 서버설정 변경
[code]
server {
listen 80;
listen [::]:80;
server_name www.test.com;
# 모든 http 요청을 https로 301 리다이렉트한다
return 301 https://$server_name$request_uri;
root /var/www/html;
index index.html index.htm index.php;
location / {
try_files $uri $uri/ =404;
}
location ~ \.php$ {
include snippets/fastcgi-php.conf;
fastcgi_pass unix:/var/run/php/php7.0-fpm.sock;
}
}
server {
listen 443;
listen [::]:443;
server_name www.test.com;
root /var/www/html;
index index.html index.htm index.php;
location / {
try_files $uri $uri/ =404;
}
ssl on;
ssl_certificate /etc/letsencrypt/live/www.test.com/fullchain.pem;
ssl_certificate_key /etc/letsencrypt/live/www.test.com/privkey.pem;
ssl_ciphers HIGH:!aNULL:!MD5;
location ~ \.php$ {
include snippets/fastcgi-php.conf;
fastcgi_pass unix:/var/run/php/php7.0-fpm.sock;
}
}
[/code]
* Nginx 서버 재시작
$ sudo systemctl restart nginx
* 발급받은 인증서 확인
$ sudo certbot certificates
* 인증서 갱신
$ sudo certbot renew
* 인증서 취소 및 삭제
$ certbot revoke --cert-path /etc/letsencrypt/live/www.test.com/cert.pem
$ sudo certbot delete --cert-name www.test.com
- Tag let's encrypt, Nginx, raspberry pi, SSL
- Response
- You can track responses via RSS / ATOM feed
- Posted
- Filed under 개발/Linux
가상호스트(VirtualHost) 기능을 이용하면 하나의 IP로 복수개의 웹서버를 운용할 수 있다.
Nginx에서 가상호스트 이용하기 위해서는 /etc/nginx/nginx.conf 하단의 # Virtual Host Configs 블럭에 가상호스트 설정을 추가하면 된다. 하지만 이러면 가독성도 떨어지고 설정파일이 지저분해진다는 문제가 있으므로 이렇게 하진 않는다.
# Virtual Host Configs 블럭에는 include /etc/nginx/sites-enabled/*; 라는 내용이 있는데 이것이 가상호스트 설정파일을 외부에 따로 작성하여 nginx.conf에서 불러오기 위한 설정이다.
일반적으로는 가상호스트용 설정파일은 /etc/nginx/sites-available/에 작성한 뒤 /etc/nginx/sites-enabled/에 심볼릭링크를 작성하여 불러오는 방식을 사용한다.
*가상호스트 설정
test.com 이라는 도메인을 구입해 사용하고 있다고 가정한다.
도메인관리 사이트에서 작성하고 싶은 가상호스트의 도메인인 abc.test.com을 서버의 IP에 A레코드로 연결시킨다. 서버가 요청을 받았을 때 응답해줄 디렉토리는 /var/www/html/test/라 한다.
* 다음과 같이 파일을 작성한다.
$sudo nano /etc/nginx/sites-available/abc.test.com
[code]
server {
listen 80;
listen [::]:80;
server_name abc.test.com;
root /var/www/html/test;
index index.htm index.html index.php;
location / {
try_files $uri $uri/ =404;
}
location ~ \.php$ {
include snippets/fastcgi-php.conf;
fastcgi_pass unix:/var/run/php/php7.0-fpm.sock;
}
}
[/code]
* sites-enabled에 심볼릭링크를 작성한다.
$ sudo ln -s /etc/nginx/sites-available/abc.test.com /etc/nginx/sites-enabled/abc.test.com
* 설정파일을 검사한 후, Nginx를 재시작한다
$ sudo nginx -t
$ sudo systemctl restart nginx
- Tag linux, raspberry pi, virtual host
- Response
- You can track responses via RSS / ATOM feed
- Posted
- Filed under 개발/Linux
메뉴 → Accessories → SD Card Copier로 USB메모리에 시스템을 떠낸다
Win32DiskImager로 USB메모리를 backup.img로 덤프한다. 백업파일의 크기는 파일내용과 상관없이 USB메모리의 크기를 따른다.
더미공간을 줄이기 위해 zip 등으로 압축한다
img파일의 파티션을 직접 조정해서 크기를 줄일 수도 있지만, 그냥 처음부터 파이의 내용이 대충 꽉 찰정도의 적당한 크기를 가진 USB메모리를 이용하는게 간편하다.
끗
Win32DiskImager로 USB메모리를 backup.img로 덤프한다. 백업파일의 크기는 파일내용과 상관없이 USB메모리의 크기를 따른다.
더미공간을 줄이기 위해 zip 등으로 압축한다
img파일의 파티션을 직접 조정해서 크기를 줄일 수도 있지만, 그냥 처음부터 파이의 내용이 대충 꽉 찰정도의 적당한 크기를 가진 USB메모리를 이용하는게 간편하다.
끗
- Tag backup, raspberry pi
- Response
- You can track responses via RSS / ATOM feed
- Posted
- Filed under 개발/Linux
* SD카드로 부팅한 상태에서 현재의 부팅모드 확인
$ vcgencmd otp_dump | grep 17
17:1020000a 가 나올 것인데 이걸 17:3020000a 로 바꿀 것이다.
* /boot/config.txt를 수정
$ echo program_usb_boot_mode=1 | sudo tee -a /boot/config.txt
$ sudo reboot
* 라즈비안을 설치한 USB장치를 준비한다
* USB장치의 /boot/cmdline.txt를 수정
[code]
dwc_otg.lpm_enable=0 console=serial0,115200 console=tty1 root=PARTUUID=164c1e26-02 rootfstype=ext4 elevator=deadline fsck.repair=yes rootwait quiet splash plymouth.ignore-serial-consoles
[/code]
를
[code]
dwc_otg.lpm_enable=0 console=serial0,115200 console=tty1 root=/dev/sda2 rootfstype=ext4 elevator=deadline fsck.repair=yes rootwait
[/code]
로 수정한다
* SD로 부팅한 후 USB장치를 마운트
연결된 저장장치 확인
$ fdisk -l
USB장치 마운트
$ mount /dev/sda2 /mnt
* USB장치의 /etc/fstab 을 수정
[code]
proc /proc proc defaults 0 0
PARTUUID=164c1e26-01 /boot vfat defaults 0 2
PARTUUID=164c1e26-02 / ext4 defaults,noatime 0 1
# a swapfile is not a swap partition, no line here
# use dphys-swapfile swap[on|off] for that
[/code]
를
[code]
proc /proc proc defaults 0 0
/dev/sda1 /boot vfat defaults 0 2
/dev/sda2 / ext4 defaults,noatime 0 1
# a swapfile is not a swap partition, no line here
# use dphys-swapfile swap[on|off] for that
[/code]
로 수정한다.
- Tag raspberry pi, 부팅
- Response
- You can track responses via RSS / ATOM feed
- Posted
- Filed under 개발/Linux
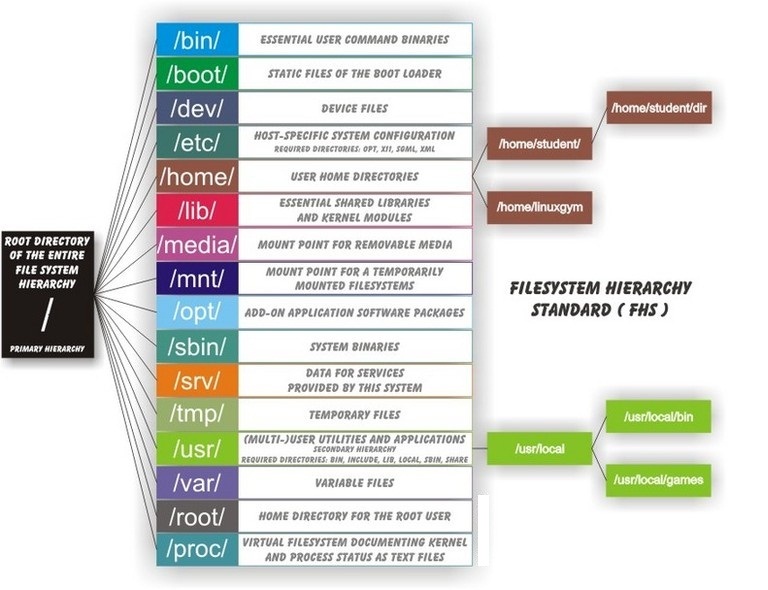
/(루트)
최상의 디렉토리인 루트 디렉토리를 의미하며, 리눅스의 모든 디렉토리들의 시작점이다. 즉, 모든 디렉토리들을 절대경로로 표기할 때에 이 디렉토리로부터 시작해야 한다.
/bin
기본적인 명령어가 저장된 디렉토리. 즉, 리눅스 시스템사용에 있어 가장 기본적이라고 할 수 있는 mv, cp, rm 등과 같은 명령어들이 이 디렉토리에 존재하며 root 사용자와 일반사용자가 함께 사용할 수 있는 명령어 디렉토리이다.
/boot
리눅스 부트로더(Boot Loader)가 존재하는 디렉토리. 즉, GRUB 과 같은 부트로더에 관한 파일들(grub.conf 등)이 이 디렉토리에 존재한다.
/dev
시스템 디바이스(device)파일을 저장하고 있는 디렉토리. 즉, 하드디스크 장치파일 /dev/sda, CD-ROM 장치파일 /dev/cdrom 등과 같은 장치파일들이 존재하는 디렉토리이다.
/etc
시스템의 거의 모든 설정파일이 존재하는 디렉토리. /etc/sysconfig(시스템 제어판용 설정파일), /etc/passwd(사용자관리 설정파일), /etc/named.conf(DNS 설정파일) 등과 같은 파일들이 존재한다.
/etc/mai/
sendmail.cf 나 access 파일등의 sendmail 의 설정파일들이 존재하는 디렉토리.
/etc/ssh/
SSH 서비스, 즉 sshd 데몬에서 사용하는 각종 설정파일들이 존재하는 디렉토리.
/etc/squid/
squid 프락시서버의 설정파일들이 저장된 디렉토리.
/etc/samba/
삼바관련 설정파일들이 저장된 디렉토리
/etc/skel/
계정사용자 생성시의 초기화파일들이 저장된 디렉토리(useradd 에서 사용함)
/etc/rc.d/
부팅레벨별 부팅스크립트파일들이 존재하는 디렉토리.
/etc/rc.d/init.d/
시스템 초기화 파일들의 실제파일들이 존재함.
/etc/pam.d/
PAM 설정 정보파일들이 저장된 디렉토리.
/etc/httpd/
RPM 으로 설치된 아파치 설정파일(httpd.conf 등)들이 저장된 디렉토리.
/etc/cron.d/, /etc/cron.daily/, /etc/cron.hourly/, /etc/cron.monthly/, /etc/cron.weekly/
모두 크론설정파일이 존재하는 디렉토리임.
/etc/xinetd.d/
xinetd 수퍼데몬에 의해 서비스되는 서비스설정파일이 존재함.
/home
사용자의 홈디렉토리, useradd 명령어로 새로운 사용자를 생성하면 대부분 사용자의 ID와 동일한 이름의 디렉토리가 자동으로 생성됨.
/lib
커널모듈파일과 라이브러리파일 즉, 커널이 필요로하는 커널모듈파일들과 프로그램(C, C++ 등)에 필요한 각종 라이브러리 파일들이 존재하는 디렉토리.
/media
DVD, CD-ROM, USB 등과 같은 탈부착이 가능한 장치들의 마운트포인트로 사용되는 디렉토리.
/mnt
/media 디렉토리와 비슷한 용도로 탈부착이 가능한 장치들에 대하여 일시적인 마운트포인트로 사용하는 디렉토리.
/proc
일명 "가상파일시스템" 이라고 하는 곳으로 현재 메모리에 존재하는 모든 작업들이 파일형태로 존재하는 곳이다. 디스크상에 실제 존재하는 것이 아니라 메모리상에 존재하기 때문에 가상파일시스템이라고 부른다. 실제 운용상태를 정확하게 파악할 수 있는 중요한 정보를 제공하며 여기에 존재하는 파일들 가운데 현재 실행중인 커널(kernel)의 옵션 값을 즉시 변경할 수 있는 파라미터파일들이 있기 때문에 시스템 운용에 있어 매우 중요한 의미를 가진다.
/root
시스템 최고관리자인 root 사용자의 개인 홈디렉토리.
/sbin
ifconfig, e2fsck, ethtool, halt 등과 같이 주로 시스템 관리자들이 사용하는 시스템관리자용 명령어를 저장하고 있는 디렉토리.
/tmp
일명 "공용디렉토리" . 시스템을 사용하는 모든 사용자들이 공동으로 사용하는 디렉토리. mysql 에서 사용하는 mysql.sock 등과 같은 소켓파일, 또는 아파치에서 사용하는 세션파일등이 생성되기도 한다. 웹해킹에 사용되기도 해서 주의를 요망.
/usr
시스템이 아닌 일반사용자들이 주로 사용하는 디렉토리. 즉, c++, chsh, cpp, crontab, du, find등과 같이 일반사용자들용 명령어들은 /usr/bin 에 위치한다.
/usr/bin/
일반 사용자들이 사용가능한 명령어 파일들이 존재하는 디렉토리.
/usr/X11R6/
X 윈도우 시스템의 루트 디렉토리.
/usr/include/
C 프로그램에 필요한 헤드파일(*.h) 디렉토리.
/usr/lib/
/lib 에 들어가지 않은 라이브러리 디렉토리.
/usr/sbin/
/bin 에 제외된 명령어와 네트워크관련 명령어가 들어있는 디렉토리.
/usr/src/
프로그램 소스(주로 커널소스)가 저장되는 디렉토리.
/usr/local/
MySQL, Apache, PHP 등과 같은 어플리케이션들을 소스로 컨파일설치할 때 사용되는 장소.
/usr/share/man/
명령어들의 도움말을 주는 메뉴얼(manual)페이지 디렉토리. 즉, 이 디렉토리에는 시스템에서 사용하는 모든 맨페이지파일(man page)이 존재함.
/var
시스템운용중에 생성되었다가 삭제되는 데이터를 일시적으로 저장하기 위한 디렉토리. 거의 모든 시스템로그파일은 /var/log 에 저장되고, DNS 의 zone 설정파일은 /var/named 에 저장되고, 메일파일은 /var/spool/mail 에 저장되며, 크론설정파일은 /var/spool/cron 디렉토리에 각각 저장됨.
/var/tmp/
/tmp 디렉토리와 같은 공용디렉토리. 즉, /tmp 디렉토리와 /var/tmp 디렉토리의 퍼미션은 1777 로서 sticky bit 가 설정되어 있는 공용디렉토리이다. 리눅스 시스템에서 공용디렉토리는 /tmp 와 /var/tmp 둘뿐이다.
/var/log/
시스템로그파일(messages, secure, xferlog 파일등)이 저장되는 디렉토리.
/var/ftp/
vsftp 등과 같은 FTP 서비스를 위한 다운로드될 파일들 즉, FTP 홈디렉토리.
/var/named/
BIND 즉, DNS 에서 사용하는 zone 파일들이 저장되는 디렉토리.
/var/spool/mail/
각 계정사용자들의 메일파일이 저장되는 디렉토리.
/var/spool/lpd/
프린트를 하기 위한 임시 디렉토리(스풀링 디렉토리).
/var/spool/mqueue/
발송을 위한 메일 일시저장 디렉토리.
/var/spool/cron/
각 사용자들의 cron 설정파일들이 저장된 디렉토리.
/var/spool/at/
atd 즉, 예약작업에 관한 파일들이 저장되는 디렉토리.
/lost+found
최상위 디렉토리인 / 디렉토리에만 존재하는 것이 아니라 파일시스템마다 존재할 수 있는 디렉토리임. 이 디렉토리는 fsck 또는 e2fsck 등과 같은 파일시스템 체크 및 복구유틸리티 실행후에 주로 생성이 되는 것으로서 복구되지 않은 채로 블록(block)만 존재하는 파일 즉, 연결이 끊어진 inode 들이 숫자파일형태로 존재하는 곳임. 숫자형태로 존재하는 파일들은 mv 명령어로 파일이름만 바꾸면 바로 복구될 수 있다.
[출처]
https://askubuntu.com/questions/138547/how-to-understand-the-ubuntu-file-system-layout
https://ko.wikipedia.org/wiki/%ED%8C%8C%EC%9D%BC%EC%8B%9C%EC%8A%A4%ED%85%9C_%EA%B3%84%EC%B8%B5%EA%B5%AC%EC%A1%B0_%ED%91%9C%EC%A4%80
https://webdir.tistory.com/101
- Response
- You can track responses via RSS / ATOM feed
- Posted
- Filed under 개발/Linux
LEMP는 Linux + Nginx + MariaDB + PHP7 의 조합을 의미한다. Nginx의 N 대신 발음하기 좋게 EngineX의 E를 쓴다
1. Nginx
Nginx는 Apache와 다르게 비동기서버라서 퍼포먼스가 더 좋고 메모리 소비량도 적다.
* nginx 설치
$ sudo apt install nginx
이 시점에서 서버의 80번 포트로 접속할수 있게 된다.
2. PHP
* Nginx는 PHP를 네이티브로 지원하지 않으므로 Fastcgi Process Manager(FPM)로 구현된 PHP를 설치한다
$ sudo apt install php-fpm
$ sudo nano /etc/nginx/sites-available/default
에서
index index.html index.htm index.nginx-debian.html;
→ index index.html index.htm index.php;
로 수정.
[code]
#location ~ \.php$ {
# include snippets/fastcgi-php.conf;
#
# # With php5-cgi alone:
# fastcgi_pass 127.0.0.1:9000;
# # With php5-fpm:
# fastcgi_pass unix:/var/run/php/php7.0-fpm.sock;
#}
[/code]
에서
[code]
location ~ \.php$ {
include snippets/fastcgi-php.conf;
fastcgi_pass unix:/var/run/php/php7.0-fpm.sock;
}
[/code]
로 수정.
* 서비스 재시작
$ sudo service nginx reload
3. MariaDB 설치
$ sudo apt install mysql-server php-mysql
* 초기셋업
$ sudo mysql_secure_installation
Enter current password for root (enter for none): 엔터
Set root password? [Y/n] y
New password: 패스워드 입력
Remove anonymous users? [Y/n] y
Disallow root login remotely? [Y/n] y
Remove test database and access to it? [Y/n] y
Reload privilege tables now? [Y/n] y
* 로그인
$ sudo mysql -uroot -p
* 워드프레스용 DB 생성
create database wordpress;
* 워드프레스 DB에 접근할 수 있는 유저 생성
create user 사용자이름 identified by '패스워드';
* 생성한 유저에 워드프레스 DB에 대한 모든 권한을 부여
grant all privileges on wordpress.* to '사용자이름'@'localhost' identified by '패스워드';
* 권한변경을 적용
flush privileges;
4. 워드프레스 설치
* html 폴더 안의 모든 파일 삭제
$ cd /var/www/html/
$ sudo rm *
* 워드프레스 다운로드
$ sudo wget http://wordpress.org/latest.tar.gz
* 다운로드한 파일의 압축해제
$ sudo tar xzf latest.tar.gz
* 워드프레스 폴더안의 모든파일을 현재 폴더로 이동
$ sudo mv wordpress/* .
* 압축파일과 빈 워드프레스 폴더를 삭제
$ sudo rm -rf wordpress latest.tar.gz
* 워드프레스 셋업
http://localhost 로 접속하여 웹브라우저 상에서 셋업
5. SSL 설정
* Let's encrypt 설치
$ sudo apt install letsencrypt
* HTTP-based DCV 방식으로 서버 인증
$ sudo letsencrypt certonly --webroot --webroot-path=/var/www/html -d test.com -d www.test.com
* 인증성공시 인증서 발급
/etc/letsencrypt/live/test.com/ 폴더에 인증서가 생성된다.
cert.pem(인증서 파일), chain.pem(인증서 발급자 파일),
fullchain.pem(cert.pem 과 chain.pen 을 하나로 합쳐놓은 파일),
privkey.pem(인증암호를 해독하는 개인키)
Apache2는 cert.pem, chain.pem, privkey.pem 을 사용.
Nginx는 fullchain.pem, privkey.pem 을 사용.
* Nginx 설정
/etc/nginx/sites-available/default를 다음과 같이 수정한다.
[code]
server {
listen 80 default_server;
listen [::]:80 default_server;
server_name www.test.com test.com;
return 301 https://$server_name$request_uri;
}
server {
listen 443 default_server;
listen [::]:443 default_server;
root /var/www/html;
index index.html index.htm index.php;
server_name _;
location / {
try_files $uri $uri/ =404;
}
ssl on;
ssl_certificate /etc/letsencrypt/live/test.com/fullchain.pem;
ssl_certificate_key /etc/letsencrypt/live/test.com/privkey.pem;
ssl_ciphers HIGH:!aNULL:!MD5;
location ~ \.php$ {
include snippets/fastcgi-php.conf;
fastcgi_pass unix:/var/run/php/php7.0-fpm.sock;
}
}
[/code]
* 인증서 갱신
$ sudo letsencrypt renew
* 인증서 삭제
$ certbot revoke --cert-path /etc/letsencrypt/live/test.com/cert.pem
$ certbot delete --cert-name test.com
- Response
- You can track responses via RSS / ATOM feed
- Posted
- Filed under 개발/Linux
* 한글폰트 설치
sudo apt install fonts-unfonts-core
* 한글입력기 설치
sudo apt install ibus-hangul
* 시스템언어 변경
Menu → Preferences → Raspberry Pi Configuration → Localisation → Set Locale → Language: Korean, Country: KR, Character Set: UTF-8 로 설정.
sudo apt install fonts-unfonts-core
* 한글입력기 설치
sudo apt install ibus-hangul
* 시스템언어 변경
Menu → Preferences → Raspberry Pi Configuration → Localisation → Set Locale → Language: Korean, Country: KR, Character Set: UTF-8 로 설정.
- Tag raspberry pi, 한글
- Response
- You can track responses via RSS / ATOM feed
- Posted
- Filed under 개발/Linux
* 방화벽 설정확인
sudo ufw status verbose
* 포트개방
sudo ufw allow [port]/[optional: protocol]
ex) sudo ufw allow 22/tcp
웹사이트 운용을 위해서는 88/443 포트를 개방
* 포트폐쇄
sudo ufw deny [port]/[optional: protocol]
ex) sudo ufw deny 22/tcp
* ufw 활성화
sudo ufw enable
* Gufw 설치 (GUFW를 통해 GUI 방식으로 ufw 설정가능)
sudo apt install gufw
sudo ufw status verbose
* 포트개방
sudo ufw allow [port]/[optional: protocol]
ex) sudo ufw allow 22/tcp
웹사이트 운용을 위해서는 88/443 포트를 개방
* 포트폐쇄
sudo ufw deny [port]/[optional: protocol]
ex) sudo ufw deny 22/tcp
* ufw 활성화
sudo ufw enable
* Gufw 설치 (GUFW를 통해 GUI 방식으로 ufw 설정가능)
sudo apt install gufw
- Tag gufw, raspberry pi, ufw
- Response
- You can track responses via RSS / ATOM feed
- Posted
- Filed under 개발/Linux
* 실행중인 스왑서비스 중지
$ sudo /etc/init.d/dphys-swapfile stop
* 스왑사이즈 변경
$ sudo nano /etc/dphys-swapfile
CONF_SWAPSIZE=1024
* 스왑서비스 시작
$ sudo /etc/init.d/dphys-swapfile start
* 변경된 스왑사이즈 확인
$ free -h
$ sudo /etc/init.d/dphys-swapfile stop
* 스왑사이즈 변경
$ sudo nano /etc/dphys-swapfile
CONF_SWAPSIZE=1024
* 스왑서비스 시작
$ sudo /etc/init.d/dphys-swapfile start
* 변경된 스왑사이즈 확인
$ free -h
- Tag raspberry pi, swap
- Response
- You can track responses via RSS / ATOM feed
- Posted
- Filed under 개발/Linux
1. 윈도우에서 원격데스크탑(RDP)로 접속할 경우
$ sudo apt install xrdp
2. VNC로 접속할 경우
$ sudo apt install vncserver
$ sudo raspi-config → 5. Interfacing Options → P3 VNC: Enable
$ sudo reboot
5900 포트가 열렸는지 확인
$ netstat -ant
$ sudo nano /boot/config.txt의 내용을 다음과 같이 수정
[code]
#framebuffer_width=1280
#framebuffer_height=720
[/code]
를
[code]
framebuffer_width=1280
framebuffer_height=720
[/code]
로 수정
$ sudo reboot
- Tag raspberry pi, rdp, vnc
- Response
- You can track responses via RSS / ATOM feed
- Posted
- Filed under 개발/Linux
* 이해하기 쉽게 풀어서 설명해 놓은 git 설명페이지
https://backlog.com/git-tutorial/kr/
* git repositories 관리 툴에는 여러가지가 있는데 github는 프라이빗 저장소에 제한이 있다. gitlab은 시놀로지에 설치는 되는데 Docker를 지원하는 고가의 기종에서만 가능하다.
https://ux.stories.pe.kr/82
* 시놀로지 gitlab 지원모델
https://www.synology.com/ko-kr/dsm/packages/Docker-GitLab
* 어쨌든 프라이빗 소스를 서비스회사에 맡기고 싶진 않아 개인서버에 git을 설치하고 웹매니징을 할수 있게 해 주는 서비스를 찾아보니 gogs와, gogs에서 파생되어 나온 gitea가 있다. 그런데 gogs는 시놀로지 서버에 설치되므로 gogs로 낙점.
https://www.slant.co/versus/1395/19087/~gogs_vs_gitea
* 속도도 다른 서비스들에 비해 충분히 빠르다.
https://gitbucket.github.io/gitbucket-news/gitbucket/2017/03/29/benchmark-of-gitbucket.html
* gogs 사용을 위해 시놀로지에 git server 설치. 유저는 생성하지 않아도 좋다.
https://www.synology.com/ko-kr/knowledgebase/DSM/help/Git/git
* 시놀로지에 gogs 설치하기
https://kimcblog.com/2018/08/28/%EC%8B%9C%EB%86%80%EB%A1%9C%EC%A7%80synology-nas%EC%97%90-github%EC%B2%98%EB%9F%BC-%EC%9A%B4%EC%9A%A9%ED%95%98%EA%B8%B0-feat-gogs-1-2/
https://kimcblog.com/2018/08/28/%ec%8b%9c%eb%86%80%eb%a1%9c%ec%a7%80synology-nas%ec%97%90-github%ec%b2%98%eb%9f%bc-%ec%9a%b4%ec%9a%a9%ed%95%98%ea%b8%b0-feat-gogs-2-2/
* 패키지 다운로드
https://gogs.io/docs/installation/install_from_binary
- gogs_0.11.86_linux_armv5를 풀어서 1_create_package 안에다 넣는다.
- 인증서에 git.주소 추가후, 역방향프록시 설정.
- 시놀로지에서 데몬 사용자 계정은 무조건 root 이다.
* 파일업로드 제한 풀기
https://dymaxionkim.github.io/beautiful-jekyll/2017-02-06-GOGS/
시놀로지 경로는 /volumeX/@appstore/Gogs/gogs/custom/conf/app.ini
* Windows에서의 git 테스트를 위한 bash 설치
- 프로그램 및 기능 -> windows 기능 켜기/끄기 -> Linux용 Windows 하위 시스템 설치 -> window store에서 win10용 ubuntu 설치.
- 각 폴더에서 바로 실행하기 위해 https://github.com/mintty/wsltty/releases 설치.
* 설치하고나서 알게된 문제
- gogs는 시놀로지에서 root 계정으로밖에 설치할수 없다
- 시놀로지는 DSM 6.0이후로 root의 ssh접속을 금한다
- gogs의 ssh 주소는 루트를 기준으로 만들어지는데 시놀로지에서 유저계정을 만들어서 ssh에 접속해도 결국 루트에 액세스할수 없어 ssh를 사용할 수가 없다. 할수없이 https 주소를 써야한다.
- xcode에서는 gogs의 remote주소를 https://도메인:포트/git주소 로 설정한뒤 로그인하는 방식으로는 인증에 실패한다. https://계정:패스워드@도메인:포트/git주소 로 설정하면 인증을 통과할 수 있다. 이때 계정은 @마크를 쓰는 이메일이 아닌 평문으로 해야 한다.
https://backlog.com/git-tutorial/kr/
* git repositories 관리 툴에는 여러가지가 있는데 github는 프라이빗 저장소에 제한이 있다. gitlab은 시놀로지에 설치는 되는데 Docker를 지원하는 고가의 기종에서만 가능하다.
https://ux.stories.pe.kr/82
* 시놀로지 gitlab 지원모델
https://www.synology.com/ko-kr/dsm/packages/Docker-GitLab
- 19 시리즈 : RS1619xs+, RS1219+, DS1819+
- 18 시리즈 : FS1018, RS3618xs, RS2818RP+, RS2418RP+, RS2418+, RS818RP+, RS818+, DS3018xs, DS1618+, DS918+, DS718+, DS218+
- 17 시리즈 : FS3017, FS2017, RS18017xs+, RS4017xs+, RS3617xs+, RS3617RPxs, RS3617xs, DS3617xs, DS1817+, DS1517+
- 16 시리즈 : RS18016xs+, RS2416RP+, RS2416+, DS916+, DS716+, DS716+II, DS216+, DS216+II
- 15 시리즈 : RS815RP+, RS815+, RC18015xs+, DS3615xs, DS2415+, DS1815+, DS1515+, DS415+
- 14 시리즈 : RS3614xs+, RS3614RPxs, RS3614xs, RS2414RP+, RS2414+, RS814RP+, RS814+
- 13 시리즈 : RS10613xs+, RS3413xs+, DS2413+, DS1813+, DS1513+, DS713+
- 12 시리즈 : RS3412RPxs, RS3412xs, RS2212RP+, RS2212+, RS812RP+, RS812+, DS3612xs, DS1812+, DS1512+, DS712+, DS412+
- 11 시리즈 : RS3411RPxs, RS3411xs, RS2211RP+, RS2211+, DS3611xs, DS2411+, DS1511+, DS411+, DS411+II
- *10 시리즈 : RS810RP+, RS810+, DS1010+, DS710+
* 어쨌든 프라이빗 소스를 서비스회사에 맡기고 싶진 않아 개인서버에 git을 설치하고 웹매니징을 할수 있게 해 주는 서비스를 찾아보니 gogs와, gogs에서 파생되어 나온 gitea가 있다. 그런데 gogs는 시놀로지 서버에 설치되므로 gogs로 낙점.
https://www.slant.co/versus/1395/19087/~gogs_vs_gitea
* 속도도 다른 서비스들에 비해 충분히 빠르다.
https://gitbucket.github.io/gitbucket-news/gitbucket/2017/03/29/benchmark-of-gitbucket.html
* gogs 사용을 위해 시놀로지에 git server 설치. 유저는 생성하지 않아도 좋다.
https://www.synology.com/ko-kr/knowledgebase/DSM/help/Git/git
* 시놀로지에 gogs 설치하기
https://kimcblog.com/2018/08/28/%EC%8B%9C%EB%86%80%EB%A1%9C%EC%A7%80synology-nas%EC%97%90-github%EC%B2%98%EB%9F%BC-%EC%9A%B4%EC%9A%A9%ED%95%98%EA%B8%B0-feat-gogs-1-2/
https://kimcblog.com/2018/08/28/%ec%8b%9c%eb%86%80%eb%a1%9c%ec%a7%80synology-nas%ec%97%90-github%ec%b2%98%eb%9f%bc-%ec%9a%b4%ec%9a%a9%ed%95%98%ea%b8%b0-feat-gogs-2-2/
* 패키지 다운로드
https://gogs.io/docs/installation/install_from_binary
- gogs_0.11.86_linux_armv5를 풀어서 1_create_package 안에다 넣는다.
- 인증서에 git.주소 추가후, 역방향프록시 설정.
- 시놀로지에서 데몬 사용자 계정은 무조건 root 이다.
* 파일업로드 제한 풀기
https://dymaxionkim.github.io/beautiful-jekyll/2017-02-06-GOGS/
시놀로지 경로는 /volumeX/@appstore/Gogs/gogs/custom/conf/app.ini
* Windows에서의 git 테스트를 위한 bash 설치
- 프로그램 및 기능 -> windows 기능 켜기/끄기 -> Linux용 Windows 하위 시스템 설치 -> window store에서 win10용 ubuntu 설치.
- 각 폴더에서 바로 실행하기 위해 https://github.com/mintty/wsltty/releases 설치.
* 설치하고나서 알게된 문제
- gogs는 시놀로지에서 root 계정으로밖에 설치할수 없다
- 시놀로지는 DSM 6.0이후로 root의 ssh접속을 금한다
- gogs의 ssh 주소는 루트를 기준으로 만들어지는데 시놀로지에서 유저계정을 만들어서 ssh에 접속해도 결국 루트에 액세스할수 없어 ssh를 사용할 수가 없다. 할수없이 https 주소를 써야한다.
- xcode에서는 gogs의 remote주소를 https://도메인:포트/git주소 로 설정한뒤 로그인하는 방식으로는 인증에 실패한다. https://계정:패스워드@도메인:포트/git주소 로 설정하면 인증을 통과할 수 있다. 이때 계정은 @마크를 쓰는 이메일이 아닌 평문으로 해야 한다.
- Response
- You can track responses via RSS / ATOM feed
- Posted
- Filed under 개발/Linux
라즈베리파이에서 구동되는 마인크래프트는 화면에 직접 렌더링을 하기 때문에 x윈도우 화면을 받아오는 원격접속으로는 마인크래프트가 실행은 되도 화면이 보이지 않는다.
하지만 다음과 같이 RealVNC에서 설명하는것처럼 라즈비안에서 Vncserver를 설치 후
https://github.com/RealVNC/raspi-preview#optimizingVncViewer
원격 컴퓨터에서 RealVNC로 접속하여
https://www.realvnc.com/en/connect/download/viewer/
라즈비안의 VNC server에서 Enable experimental direct capture mode를 선택하면 화면을 그대로 받아와서 뿌려주게 되므로 원격접속에서도 마인크래프트를 실행시킬 수 있다
https://wikidocs.net/3208
- Tag minecraft, raspberry pi, rdp, vnc
- Response
- You can track responses via RSS / ATOM feed
- Posted
- Filed under 개발/Linux
- Response
- You can track responses via RSS / ATOM feed
- Posted
- Filed under 개발/Linux
어제 무슨 블로그 평가하는데서 블로그를 평가해 봤는데
www.silphion.net
silphion.net
이 서로 다른 두 개의 사이트인것으로 인식되니 하나로 통합하라는 지적을 받았다.
이렇게 쓰면 트래픽이 분산이 되서 좋지 않다나? 나는 어차피 이 도메인 속에서 다른 서비스를 돌릴 계획이 없으니 앞에 www.를 붙이지 않는 깔끔한 쪽으로 간 거였는데 실제 검색엔진에서는 www.silphion.net 도 잡고 silphion.net 도 잡고 있었다는 것이다.
그런 이유로 www.silphion.net 로 온 트래픽을 silphion.net 으로 돌려주는 301 redirect 법을 소개. 트래픽을 넘기는 법은 여러가지가 있을 수 있는데 검색엔진이 추천하는 301 redirect는 다음과 같은 방식으로 한다.
다음에 소개하는 행을 루트에 있는 .htaccess 파일에 써 넣으면 된다. 위치는 어디라도 상관없는 듯.
* 「www.없음」으로 통일할 때
Options +FollowSymLinks
RewriteEngine on
RewriteCond %{HTTP_HOST} ^www.sample\.com
RewriteRule ^(.*)$ http://sample.com/$1 [R=301,L]
* 「www.」으로 통일할 때
Options +FollowSymLinks
RewriteEngine on
RewriteCond %{HTTP_HOST} ^sample\.com
RewriteRule ^(.*)$ http://www.sample.com/$1 [R=301,L]
출처 :
301リダイレクトを使った「WWWあり」と「WWWなし」の統一
- Tag 301 redirect, www.
- Response
- You can track responses via RSS / ATOM feed
- Posted
- Filed under 개발/Linux
출처 : rain9.com
필요한 파일이 robots.txt라는 조그마한 텍스트 파일입니다. 정리하면 robots.txt파일을 생성해야 하는 이유는 크게 두가지입니다. 트래픽을 조절할 수 있다는 것과 다른 사람에게 알리고 싶지 않는 정보를 보호하기 위해서 입니다. 이 파일의 역할을 당신의 블로그를 방문하는 로봇들에게 사이트를 검색하게 허용할 것인지, 허용한다면 어떤 로봇에게, 어떤 디렉토리를 허용할지를 담고 있는 파일입니다.
윈도우의 경우 메모장을 이용해서 생성하면 되는데요, 파일은 반드시 계정의 최상위(root) 디렉토리에 있어야 합니다. 이를테면 제 사이트 http://bklove.info/ 라면 http://bklove.info/robots.txt 에 위치해야 합니다. http://bklove.info/temp/robots.txt 라면 제대로 작동하지 않습니다.
파일의 내용은 크게 세 부분으로 나뉩니다.
주석(#), 로봇의 이름을 적는 부분(User-agent) , 방문을 허용하지 않을 디렉토리를 적는 부분(Disallow)으로 구분됩니다.
User-agent: *
Disallow: /
위처럼 적으면 모든 로봇에서 모든 디렉토리에 대한 검색을 불가능하게 하겠다는 뜻을 담고 있습니다. [*]는 User-agent에서만 사용가능한데 [모든 로봇]이라는 뜻을 지니고 있습니다. Disallow의 [/]는 디렉토리에 있는 모든 폴더를 나타내는 것이구요.
만약 특정 디렉토리를 차단하게 하려면 다음과 같이 적어주면 됩니다.
User-agent: *
Disallow: /blog
위는 모든 로봇[*]에게 [blog]디렉토리 아래에 있는 부분에 대해서는 접근을 차단한다는 내용을 담고 있습니다.
그렇다면 특정 로봇을 차단하는 방법은 어떤게 있을까요? 이를테면 사이트에서 네이버의 로봇이 활동하게 하지 못하는 방법은 다음과 같습니다.
User-agent: Cowbot
Disallow: /
Cowbot은 네이버 로봇의 이름입니다. 위처럼 작성해주시면 네이버 로봇의 경우 검색을 하지 못하게 됩니다.
조금 복잡하게 구글과 네이버는 허용하고, 그외에는 모두 차단하는 방법은 다음과 같습니다.
User-agent: Cowbot
Disallow:
User-agent: Googlebot
Disallow:
User-agent: *
Disallow: /
Disallow에 아무적도 적지 않으면 모두 허용한다는 의미가 되기 때문이죠.
/blog와 /blog/는 조금 다릅니다.
/blog의 경우는 /blog/a.htm와 /blog.htm에 대해서 불가능한 것이고
/blog/의 경우는 /blog/a.htm에 대해서만 불가능 합니다.
즉 /blog는 디렉토리와 파일까지도 포함하고, /blog/는 디렉토리만을 의미하거든요.
앞 서 트래픽을 아끼기 위해서 이미지 로봇을 차단하는 방법은 다음과 같습니다. 참고로 원래는 Disallow항목에 *표시를 넣을 수 없습니다. 이 명령어는 구글과 MSN등에서만 통용되구요. 파일명 뒤에 반드시 $표시를 해주셔야 합니다. 즉 모든 검색엔진에서 통용되지는 않습니다.
User-agent: Googlebot-Image
Disallow: /*.gif$
Disallow: /*.jpg$
위 문장은 구글의 이미지를 검색하는 로봇에게 gif와 jpg로 된 이미지를 모두 검색하지 않도록 하는 명령어입니다.
참고로 주석문을 작성하기 위해서는 앞에 #를 적어주시면 됩니다. 로봇의 이름은 개별 검색사이트를 방문하셔서 아셔야 합니다. 주로 쓰는 로봇의 이름만 알려드리면...
구글: Googlebot
구글 이미지 : googlebot-image
네이버 : cowbot
야후 : Slurp
야후 이미지 : Yahoo-MMCrawler
엠파스봇 : empas
MSN : MSNBot
첫눈: 1Noonbot 1.0
차단했을 경우에, 즉시 삭제되는 것은 아니지만 시간이 지나면 검색포털에서의 검색 결과 역시 삭제된다는 사실을 염두에 두셔야 합니다.
* Crawl-Delay 항목을 지정하시면 검색엔진의 방문을 지연시킬 수 있습니다. 기본단위는 초단위입니다. 아래의 명령어 역시 위의 *.jpg$처럼 야후, MSN에서만 작동됩니다.
User-agent: Slurp
Crawl-delay: 20
이렇게 하시면, 모든 검색로봇의 방문을 허용하되 5초동안은 다시 방문을 하지 않도록 지정하게 됩니다.** http://www.mcanerin.com/EN/search-engine/robots-txt.asp 이곳에 가시면.. 비록 외국 사이트긴 하지만.. robots.txt를 제작해줍니다. ^^!! 고르기만 하면 자동으로 파일을 생성해주죠. 가져와서 메모장에 붙여놓고 저장후 FTP로 올리면 됩니다.
*** http://tool.motoricerca.info/robots-checker.phtml 이곳은 만들어진 robots.txt파일이 잘 작성되었는지 검사해주는 사이트입니다.
**** 끝으로 제가 사용하고 있는 robots.txt는 http://bklove.info/robots.txt 여기서 확인이 가능합니다. 야후의 경우 시간을 지연시키는 명령어를 사용했고, 구글과 구글이미지, MSN의 경우 이미지와 PDF, ZIP, PPT파일에 대한 검색을 차단했습니다.
http://cafe.naver.com/nanospeed.cafe?iframe_url=/ArticleRead.nhn%3Farticleid=188
네이버 [robots.txt]이용 검색로봇 차단 가이드 검색 카페 최상위 글
- Response
- You can track responses via RSS / ATOM feed
Comments List
좋은 방법이네요! 혹시 www안붙은 도메인을 www로 연결되게 하는방법과 서브도메인 (예를들면 .net을 .com으로 이동시키는 방법)을 같이 구현할수없을까요?
글쎄요.. 퍼온거라 그 부분까지는 잘 모르겠네요. 죄송합니다.