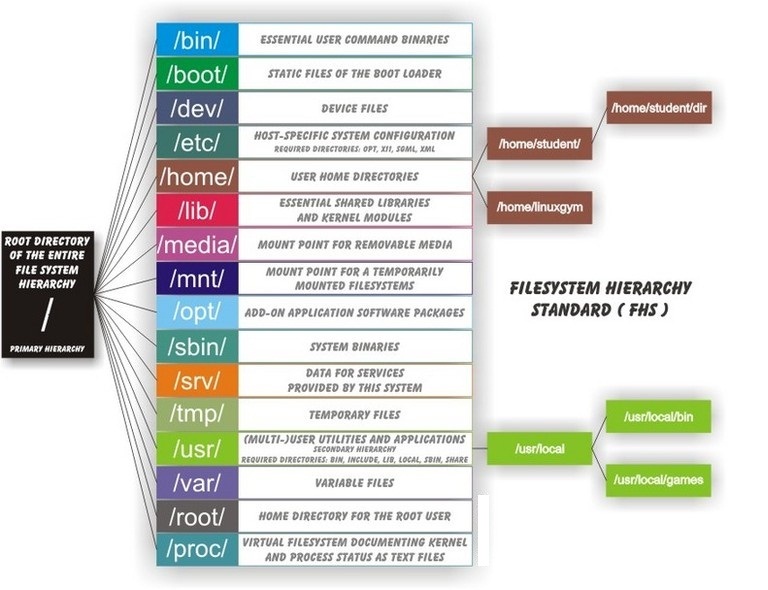
Posted
Filed under 개발/Linux
사용자 삽입 이미지

/(루트)
최상의 디렉토리인 루트 디렉토리를 의미하며, 리눅스의 모든 디렉토리들의 시작점이다. 즉, 모든 디렉토리들을 절대경로로 표기할 때에 이 디렉토리로부터 시작해야 한다.

/bin
기본적인 명령어가 저장된 디렉토리. 즉, 리눅스 시스템사용에 있어 가장 기본적이라고 할 수 있는 mv, cp, rm 등과 같은 명령어들이 이 디렉토리에 존재하며 root 사용자와 일반사용자가 함께 사용할 수 있는 명령어 디렉토리이다.

/boot
리눅스 부트로더(Boot Loader)가 존재하는 디렉토리. 즉, GRUB 과 같은 부트로더에 관한 파일들(grub.conf 등)이 이 디렉토리에 존재한다.

/dev
시스템 디바이스(device)파일을 저장하고 있는 디렉토리. 즉, 하드디스크 장치파일 /dev/sda, CD-ROM 장치파일 /dev/cdrom 등과 같은 장치파일들이 존재하는 디렉토리이다.

/etc
시스템의 거의 모든 설정파일이 존재하는 디렉토리. /etc/sysconfig(시스템 제어판용 설정파일), /etc/passwd(사용자관리 설정파일), /etc/named.conf(DNS 설정파일) 등과 같은 파일들이 존재한다.

/etc/mai/
sendmail.cf 나 access 파일등의 sendmail 의 설정파일들이 존재하는 디렉토리.

/etc/ssh/
SSH 서비스, 즉 sshd 데몬에서 사용하는 각종 설정파일들이 존재하는 디렉토리.

/etc/squid/
squid 프락시서버의 설정파일들이 저장된 디렉토리.

/etc/samba/
삼바관련 설정파일들이 저장된 디렉토리

/etc/skel/
계정사용자 생성시의 초기화파일들이 저장된 디렉토리(useradd 에서 사용함)

/etc/rc.d/
부팅레벨별 부팅스크립트파일들이 존재하는 디렉토리.

/etc/rc.d/init.d/
시스템 초기화 파일들의 실제파일들이 존재함.

/etc/pam.d/
PAM 설정 정보파일들이 저장된 디렉토리.

/etc/httpd/
RPM 으로 설치된 아파치 설정파일(httpd.conf 등)들이 저장된 디렉토리.

/etc/cron.d/, /etc/cron.daily/, /etc/cron.hourly/, /etc/cron.monthly/, /etc/cron.weekly/
모두 크론설정파일이 존재하는 디렉토리임.

/etc/xinetd.d/
xinetd 수퍼데몬에 의해 서비스되는 서비스설정파일이 존재함.

/home
사용자의 홈디렉토리, useradd 명령어로 새로운 사용자를 생성하면 대부분 사용자의 ID와 동일한 이름의 디렉토리가 자동으로 생성됨.

/lib
커널모듈파일과 라이브러리파일 즉, 커널이 필요로하는 커널모듈파일들과 프로그램(C, C++ 등)에 필요한 각종 라이브러리 파일들이 존재하는 디렉토리.

/media
DVD, CD-ROM, USB 등과 같은 탈부착이 가능한 장치들의 마운트포인트로 사용되는 디렉토리.

/mnt
/media 디렉토리와 비슷한 용도로 탈부착이 가능한 장치들에 대하여 일시적인 마운트포인트로 사용하는 디렉토리.

/proc
일명 "가상파일시스템" 이라고 하는 곳으로 현재 메모리에 존재하는 모든 작업들이 파일형태로 존재하는 곳이다. 디스크상에 실제 존재하는 것이 아니라 메모리상에 존재하기 때문에 가상파일시스템이라고 부른다. 실제 운용상태를 정확하게 파악할 수 있는 중요한 정보를 제공하며 여기에 존재하는 파일들 가운데 현재 실행중인 커널(kernel)의 옵션 값을 즉시 변경할 수 있는 파라미터파일들이 있기 때문에 시스템 운용에 있어 매우 중요한 의미를 가진다.

/root
시스템 최고관리자인 root 사용자의 개인 홈디렉토리.

/sbin
ifconfig, e2fsck, ethtool, halt 등과 같이 주로 시스템 관리자들이 사용하는 시스템관리자용 명령어를 저장하고 있는 디렉토리.

/tmp
일명 "공용디렉토리" . 시스템을 사용하는 모든 사용자들이 공동으로 사용하는 디렉토리. mysql 에서 사용하는 mysql.sock 등과 같은 소켓파일, 또는 아파치에서 사용하는 세션파일등이 생성되기도 한다. 웹해킹에 사용되기도 해서 주의를 요망.

/usr
시스템이 아닌 일반사용자들이 주로 사용하는 디렉토리. 즉, c++, chsh, cpp, crontab, du, find등과 같이 일반사용자들용 명령어들은 /usr/bin 에 위치한다.

/usr/bin/
일반 사용자들이 사용가능한 명령어 파일들이 존재하는 디렉토리.

/usr/X11R6/
X 윈도우 시스템의 루트 디렉토리.

/usr/include/
C 프로그램에 필요한 헤드파일(*.h) 디렉토리.

/usr/lib/
/lib 에 들어가지 않은 라이브러리 디렉토리.

/usr/sbin/
/bin 에 제외된 명령어와 네트워크관련 명령어가 들어있는 디렉토리.

/usr/src/
프로그램 소스(주로 커널소스)가 저장되는 디렉토리.

/usr/local/
MySQL, Apache, PHP 등과 같은 어플리케이션들을 소스로 컨파일설치할 때 사용되는 장소.

/usr/share/man/
명령어들의 도움말을 주는 메뉴얼(manual)페이지 디렉토리. 즉, 이 디렉토리에는 시스템에서 사용하는 모든 맨페이지파일(man page)이 존재함.

/var
시스템운용중에 생성되었다가 삭제되는 데이터를 일시적으로 저장하기 위한 디렉토리. 거의 모든 시스템로그파일은 /var/log 에 저장되고, DNS 의 zone 설정파일은 /var/named 에 저장되고, 메일파일은 /var/spool/mail 에 저장되며, 크론설정파일은 /var/spool/cron 디렉토리에 각각 저장됨.

/var/tmp/
/tmp 디렉토리와 같은 공용디렉토리. 즉, /tmp 디렉토리와 /var/tmp 디렉토리의 퍼미션은 1777 로서 sticky bit 가 설정되어 있는 공용디렉토리이다. 리눅스 시스템에서 공용디렉토리는 /tmp 와 /var/tmp 둘뿐이다.

/var/log/
시스템로그파일(messages, secure, xferlog 파일등)이 저장되는 디렉토리.

/var/ftp/
vsftp 등과 같은 FTP 서비스를 위한 다운로드될 파일들 즉, FTP 홈디렉토리.

/var/named/
BIND 즉, DNS 에서 사용하는 zone 파일들이 저장되는 디렉토리.

/var/spool/mail/
각 계정사용자들의 메일파일이 저장되는 디렉토리.

/var/spool/lpd/
프린트를 하기 위한 임시 디렉토리(스풀링 디렉토리).

/var/spool/mqueue/
발송을 위한 메일 일시저장 디렉토리.

/var/spool/cron/
각 사용자들의 cron 설정파일들이 저장된 디렉토리.

/var/spool/at/
atd 즉, 예약작업에 관한 파일들이 저장되는 디렉토리.

/lost+found
최상위 디렉토리인 / 디렉토리에만 존재하는 것이 아니라 파일시스템마다 존재할 수 있는 디렉토리임. 이 디렉토리는 fsck 또는 e2fsck 등과 같은 파일시스템 체크 및 복구유틸리티 실행후에 주로 생성이 되는 것으로서 복구되지 않은 채로 블록(block)만 존재하는 파일 즉, 연결이 끊어진 inode 들이 숫자파일형태로 존재하는 곳임. 숫자형태로 존재하는 파일들은 mv 명령어로 파일이름만 바꾸면 바로 복구될 수 있다.

[출처]
https://askubuntu.com/questions/138547/how-to-understand-the-ubuntu-file-system-layout

https://ko.wikipedia.org/wiki/%ED%8C%8C%EC%9D%BC%EC%8B%9C%EC%8A%A4%ED%85%9C_%EA%B3%84%EC%B8%B5%EA%B5%AC%EC%A1%B0_%ED%91%9C%EC%A4%80

https://webdir.tistory.com/101
2019/04/09 11:29 2019/04/09 11:29
Posted
Filed under 개발/Linux
LEMP는 Linux + Nginx + MariaDB + PHP7 의 조합을 의미한다. Nginx의 N 대신 발음하기 좋게 EngineX의 E를 쓴다

1. Nginx
Nginx는 Apache와 다르게 비동기서버라서 퍼포먼스가 더 좋고 메모리 소비량도 적다.

* nginx 설치
$ sudo apt install nginx
이 시점에서 서버의 80번 포트로 접속할수 있게 된다.


2. PHP
* Nginx는 PHP를 네이티브로 지원하지 않으므로 Fastcgi Process Manager(FPM)로 구현된 PHP를 설치한다
$ sudo apt install php-fpm
$ sudo nano /etc/nginx/sites-available/default
에서
index index.html index.htm index.nginx-debian.html;
→ index index.html index.htm index.php;
로 수정.

[code]
#location ~ \.php$ {
# include snippets/fastcgi-php.conf;
#
# # With php5-cgi alone:
# fastcgi_pass 127.0.0.1:9000;
# # With php5-fpm:
# fastcgi_pass unix:/var/run/php/php7.0-fpm.sock;
#}
[/code]
에서

[code]
location ~ \.php$ {
    include snippets/fastcgi-php.conf;
    fastcgi_pass unix:/var/run/php/php7.0-fpm.sock;
}
[/code]
로 수정.

* 서비스 재시작
$ sudo service nginx reload


3. MariaDB 설치
$ sudo apt install mysql-server php-mysql

* 초기셋업
$ sudo mysql_secure_installation

Enter current password for root (enter for none): 엔터
Set root password? [Y/n] y
New password: 패스워드 입력
Remove anonymous users? [Y/n] y
Disallow root login remotely? [Y/n] y
Remove test database and access to it? [Y/n] y
Reload privilege tables now? [Y/n] y

* 로그인
$ sudo mysql -uroot -p

* 워드프레스용 DB 생성
create database wordpress;

* 워드프레스 DB에 접근할 수 있는 유저 생성
create user 사용자이름 identified by '패스워드';

* 생성한 유저에 워드프레스 DB에 대한 모든 권한을 부여
grant all privileges on wordpress.* to '사용자이름'@'localhost' identified by '패스워드';

* 권한변경을 적용
flush privileges;


4. 워드프레스 설치

* html 폴더 안의 모든 파일 삭제
$ cd /var/www/html/
$ sudo rm *

* 워드프레스 다운로드
$ sudo wget http://wordpress.org/latest.tar.gz

* 다운로드한 파일의 압축해제
$ sudo tar xzf latest.tar.gz

* 워드프레스 폴더안의 모든파일을 현재 폴더로 이동
$ sudo mv wordpress/* .

* 압축파일과 빈 워드프레스 폴더를 삭제
$ sudo rm -rf wordpress latest.tar.gz

* 워드프레스 셋업
http://localhost 로 접속하여 웹브라우저 상에서 셋업


5. SSL 설정

* Let's encrypt 설치
$ sudo apt install letsencrypt

* HTTP-based DCV 방식으로 서버 인증
$ sudo letsencrypt certonly --webroot --webroot-path=/var/www/html -d test.com -d www.test.com

* 인증성공시 인증서 발급
/etc/letsencrypt/live/test.com/ 폴더에 인증서가 생성된다.
cert.pem(인증서 파일), chain.pem(인증서 발급자 파일),
fullchain.pem(cert.pem 과 chain.pen 을 하나로 합쳐놓은 파일),
privkey.pem(인증암호를 해독하는 개인키)

Apache2는 cert.pem, chain.pem, privkey.pem 을 사용.
Nginx는 fullchain.pem, privkey.pem 을 사용.

* Nginx 설정
/etc/nginx/sites-available/default를 다음과 같이 수정한다.

[code]
server {
    listen 80 default_server;
    listen [::]:80 default_server;

    server_name www.test.com test.com;
    return 301 https://$server_name$request_uri;
}

server {
    listen 443 default_server;
    listen [::]:443 default_server;

    root /var/www/html;
    index index.html index.htm index.php;
    server_name _;

    location / {
        try_files $uri $uri/ =404;
    }

    ssl                  on;
    ssl_certificate      /etc/letsencrypt/live/test.com/fullchain.pem;
    ssl_certificate_key  /etc/letsencrypt/live/test.com/privkey.pem;
    ssl_ciphers  HIGH:!aNULL:!MD5;

    location ~ \.php$ {
        include snippets/fastcgi-php.conf;
        fastcgi_pass unix:/var/run/php/php7.0-fpm.sock;
    }
}
[/code]

* 인증서 갱신
$ sudo letsencrypt renew

* 인증서 삭제
$ certbot revoke --cert-path /etc/letsencrypt/live/test.com/cert.pem
$ certbot delete --cert-name test.com
2019/04/09 08:55 2019/04/09 08:55
Posted
Filed under 개발/Linux
* 한글폰트 설치
sudo apt install fonts-unfonts-core

* 한글입력기 설치
sudo apt install ibus-hangul

* 시스템언어 변경
Menu → Preferences → Raspberry Pi Configuration → Localisation → Set Locale → Language: Korean, Country: KR, Character Set: UTF-8 로 설정.
2019/04/09 07:49 2019/04/09 07:49
Posted
Filed under 개발/Linux
* 방화벽 설정확인
sudo ufw status verbose

* 포트개방
sudo ufw allow [port]/[optional: protocol]
 ex) sudo ufw allow 22/tcp
웹사이트 운용을 위해서는 88/443 포트를 개방

* 포트폐쇄
sudo ufw deny [port]/[optional: protocol]
ex) sudo ufw deny 22/tcp

* ufw 활성화
sudo ufw enable

* Gufw 설치 (GUFW를 통해 GUI 방식으로 ufw 설정가능)
sudo apt install gufw

2019/04/09 00:18 2019/04/09 00:18
Posted
Filed under 개발/Linux
* 실행중인 스왑서비스 중지
$ sudo /etc/init.d/dphys-swapfile stop

* 스왑사이즈 변경
$ sudo nano /etc/dphys-swapfile
CONF_SWAPSIZE=1024

* 스왑서비스 시작
$ sudo /etc/init.d/dphys-swapfile start

* 변경된 스왑사이즈 확인
$ free -h

2019/04/09 00:04 2019/04/09 00:04
Posted
Filed under 개발/Linux
1. 윈도우에서 원격데스크탑(RDP)로 접속할 경우
$ sudo apt install xrdp

2. VNC로 접속할 경우
$ sudo apt install vncserver
$ sudo raspi-config → 5. Interfacing Options → P3 VNC: Enable
$ sudo reboot

5900 포트가 열렸는지 확인
$ netstat -ant

$ sudo nano /boot/config.txt의 내용을 다음과 같이 수정
[code]
#framebuffer_width=1280
#framebuffer_height=720
[/code]


[code]
framebuffer_width=1280
framebuffer_height=720
[/code]
로 수정

$ sudo reboot
2019/04/08 23:56 2019/04/08 23:56
Posted
Filed under 개발/iOS
사용자 삽입 이미지


잠수함을 타고 끝없는 심해로 들어가세요.

코인 다섯개를 모아 연료탱크를 업그레이드합니다.
50번의 업그레이드 후 연료탱크는 더이상 소모되지 않습니다.
스타 취득시 연료가 증가하고 잠수함이 작아져
장애물을 더욱 손쉽게 빠져나갈 수 있습니다.

10,000 m 잠수에 도전하세요!


https://itunes.apple.com/app/id1457811913
사용자 삽입 이미지


2019/04/04 19:15 2019/04/04 19:15
Posted
Filed under 개발/iOS
Family Model Size
(Inch)
Width (Points) Height (Points) Rendered Width
(Pixel)
Rendered Height
(Pixel)
Points Per Inch Retina Factor Release Date
iPad Pro (3nd gen 12.9") 12.9 1024 1366 2048 2732 264 2 10/30/2018
iPad Pro (2nd gen 12.9") 12.9 1024 1366 2048 2732 264 2 6/13/2017
iPad Pro (1st gen 12.9") 12.9 1024 1366 2048 2732 264 2 11/11/2015
iPad Pro (3nd gen 11") 11 834 1194 1668 2388 264 2 10/30/2018
iPad Pro (2nd gen 10.5") 10.5 834 1112 1668 2224 264 2 6/13/2017
iPad Pro (1st gen 9.7”) 9.7 768 1024 1536 2048 264 2 3/31/2016
iPad Air 3 10.5 834 1112 1668 2224 264 2 3/18/2019
iPad Air 2 9.7 768 1024 1536 2048 326 2 10/22/2014
iPad Air 9.7 768 1024 1536 2048 264 2 11/1/2013
iPad 6th gen 9.7 768 1024 1536 2048 264 2 3/27/2018
iPad 5th gen 9.7 768 1024 1536 2048 264 2 3/24/2017
iPad 4th gen 9.7 768 1024 1536 2048 264 2 11/12/2012
iPad 3rd gen 9.7 768 1024 1536 2048 264 2 3/16/2012
iPad 2 9.7 768 1024 768 1024 132 1 3/11/2011
iPad 1st gen 9.7 768 1024 768 1024 132 1 4/3/2010
iPad mini 5 7.9 768 1024 1536 2048 326 2 3/18/2019
iPad mini 4 7.9 768 1024 1536 2048 326 2 9/9/2015
iPad mini 3 7.9 768 1024 1536 2048 264 2 10/22/2014
iPad mini 2 7.9 768 1024 1536 2048 326 2 11/12/2013
iPad mini 7.9 768 1024 768 1024 163 1 11/2/2012
iPhone XS Max 6.5 414 896 1242 2688 458 3 9/21/2018
iPhone XR 6.1 413 896 826 1792 326 2 10/26/2018
iPhone XS 5.8 375 812 1125 2436 458 3 9/21/2018
iPhone X 5.8 375 812 1125 2436 458 3 11/3/2017
iPhone 8 Plus 5.5 414 736 1242 2208 401 3 9/22/2017
iPhone 7 Plus 5.5 414 736 1242 2208 401 3 9/16/2016
iPhone 6s Plus 5.5 414 736 1242 2208 401 3 9/25/2015
iPhone 6 Plus 5.5 414 736 1242 2208 401 3 9/19/2014
iPhone 8 4.7 375 667 750 1334 326 2 9/22/2017
iPhone 7 4.7 375 667 750 1334 326 2 9/16/2016
iPhone 6s 4.7 375 667 750 1334 326 2 9/25/2015
iPhone 6 4.7 375 667 750 1334 326 2 9/19/2014
iPhone SE 4 320 568 640 1136 326 2 3/31/2016
iPhone 5c 4 320 568 640 1136 326 2 9/20/2013
iPhone 5s 4 320 568 640 1136 326 2 9/20/2013
iPhone 5 4 320 568 640 1136 326 2 9/21/2012
iPhone 4S 3.5 320 480 640 960 326 2 10/14/2011
iPhone 4 3.5 320 480 640 960 326 2 6/21/2010
iPhone 3GS 3.5 320 480 320 480 163 1 6/19/2009
iPhone 3G 3.5 320 480 320 480 163 1 7/11/2008
iPhone 1st 3.5 320 480 320 480 163 1 6/29/2007
iPod touch 6th gen 4 320 568 640 1136 326 2 7/15/2015
iPod touch 5th gen 4 320 568 640 1136 326 2 10/11/2012
iPod touch 4th gen 3.54 320 480 640 960 326 2 9/1/2010
iPod touch 3rd gen 3.54 320 480 320 480 163 1 9/9/2009
iPod touch 2nd gen 3.54 320 480 320 480 163 1 9/9/2008
iPod touch 1st gen 3.54 320 480 320 480 163 1 9/5/2007
2019/03/29 13:10 2019/03/29 13:10
Posted
Filed under 개발/하드웨어

APPLE 맥북프로 2018년형 MR932KH/A (SSD 256GB)

최저가
2,497,000 자세히보기


남다른 클래스와 차이, MacBook Pro 새로운 인텔  고성능 프로세서 넉넉한 용량의 메모리 매혹적인 Retina 디스플레이 효율적인 Touch Bar 강력하고, 뛰어난 성능 고성능 인텔 프로세서와 넉넉한 메모리, 빠른 저장 장치로 무장한  MacBook Pro와 함께 어디서든, 그 어느 때보다 빠르게 작업할 수 있습니다. 차세대 보안 기술의 APPLE T2칩 탑재 Apple이 설계한 2세대 맞춤형 Mac용 칩인 Apple T2 칩을 장착하여, 강력한 MacBook Pro의 보안을 한층 더 강화하였습니다. Apple T2 칩에는 보안 부팅 및 저장 장치 암호화 기능의 기반이 되는 Secure Enclave 보조 프로세서가 내장되어있어, 더 강력하고 뛰어난 보안 기술을 보여줍니다.  2세대 맞춤형 Mac용 T2칩 보안 부팅 및 하드웨어적인 암호화 저장을 즉각적으로  지원하며, 시스템 관리 컨트롤러, 오디오 컨트롤러,  SSD 컨트롤러 등 모든 개별 컨트롤러를 Apple T2칩에서  통합 관리가 가능합니다. 음성인식 비서 Siri 소환 가능 새로 탑재된 Apple T2칩을 통한 음성인식 비서 Siri를 소환할 수 있습니다. MacBook 시리즈 최초로 Siri를 통한  음성 명령 구현이 가능해져 언제든 “Siri야”라고 불러서 다양한 작업들을 수행할 수 있습니다. 놀라운, 생생한 디스플레이 MacBook Pro의 Retina 디스플레이는 역대 최고의 Mac 노트북 디스플레이입니다.  밝은 LED 백라이트와 높은 명암비를 통해 진한 검은색과 밝은 하얀색을 뚜렷하게 표현하고,  넓은 P3 색영역을 지원하여 sRGB보다 더욱더 생생한 초록색과 빨간색을 구현합니다. 놀랍고도 생생한 Retina 디스플레이를 경험해보세요. True Tone 기술 지원 주변 조명의 색온도에 맞게 자동으로 화이트 밸런스를 조절해서 더욱 자연스러운 화면을 구현해주는 기술로, 눈의 피로도 감소 및 디스플레이의 정확한 색표현을 보여줍니다. 효율적인 업무 방법.  직관적인 Touch Bar Touch Bar는 기존에 키보드 상단을 차지하고 있었던 기능키를 대신하여  훨씬 더 다재다능하고 강력한 기능을 선보입니다. 시스템 컨트롤, 인터랙티브  방식의 콘텐츠 정리 및 탐색, 스마트한 타이핑 기능 등, 자동으로 모습을 바꾸며  직관적으로 사용할 수 있도록 관련 도구들을 보여줍니다. 간편한 잠금해제, Touch ID 손가락 터치 한 번에 Mac을 바로 잠금 해제하고,  시스템 설정과 잠금 메모도 빠르게 열어볼 수 있습니다.  첨단 보안 인증 기술인 Touch ID로 더욱 안전하고  빠른 인증 기술을 구현합니다. 다재다능한 포트 Thunderbolt 3 커넥터 하나로 데이터 전송, 충전, 동영상 출력이 모두 가능한, Thunderbolt 3  기존 포트 보다 2배 커진 대역폭으로 최대 40Gb/s의 처리량을 자랑하며 리버서블 디자인으로 어느 쪽에서든 편하게 모든 연결이 가능합니다.  조용한 타이핑,  조용해진 작업 공간 나비식 매커니즘이 적용된 MacBook Pro의 키보드는 기존 가위식 매커니즘에 비해  4배 더 향상된 안정성과 함께 더욱 훌륭한 편안함과 조용한 타이핑을 선사합니다. 넓은 Force Touch 트랙패드는 제스처든 클릭이든 손가락을 움직이기에 넉넉한 공간을 제공합니다


다나와 저작권 안내

2019/03/17 13:01 2019/03/17 13:01
Posted
Filed under 개발/Linux
* 이해하기 쉽게 풀어서 설명해 놓은 git 설명페이지
https://backlog.com/git-tutorial/kr/


* git repositories 관리 툴에는 여러가지가 있는데 github는 프라이빗 저장소에 제한이 있다. gitlab은 시놀로지에 설치는 되는데 Docker를 지원하는 고가의 기종에서만 가능하다.
https://ux.stories.pe.kr/82


* 시놀로지 gitlab 지원모델
https://www.synology.com/ko-kr/dsm/packages/Docker-GitLab

  • 19 시리즈 : RS1619xs+, RS1219+, DS1819+
  • 18 시리즈 : FS1018, RS3618xs, RS2818RP+, RS2418RP+, RS2418+, RS818RP+, RS818+, DS3018xs, DS1618+, DS918+, DS718+, DS218+
  • 17 시리즈 : FS3017, FS2017, RS18017xs+, RS4017xs+, RS3617xs+, RS3617RPxs, RS3617xs, DS3617xs, DS1817+, DS1517+
  • 16 시리즈 : RS18016xs+, RS2416RP+, RS2416+, DS916+, DS716+, DS716+II, DS216+, DS216+II
  • 15 시리즈 : RS815RP+, RS815+, RC18015xs+, DS3615xs, DS2415+, DS1815+, DS1515+, DS415+
  • 14 시리즈 : RS3614xs+, RS3614RPxs, RS3614xs, RS2414RP+, RS2414+, RS814RP+, RS814+
  • 13 시리즈 : RS10613xs+, RS3413xs+, DS2413+, DS1813+, DS1513+, DS713+
  • 12 시리즈 : RS3412RPxs, RS3412xs, RS2212RP+, RS2212+, RS812RP+, RS812+, DS3612xs, DS1812+, DS1512+, DS712+, DS412+
  • 11 시리즈 : RS3411RPxs, RS3411xs, RS2211RP+, RS2211+, DS3611xs, DS2411+, DS1511+, DS411+, DS411+II
  • *10 시리즈 : RS810RP+, RS810+, DS1010+, DS710+


* 어쨌든 프라이빗 소스를 서비스회사에 맡기고 싶진 않아 개인서버에 git을 설치하고 웹매니징을 할수 있게 해 주는 서비스를 찾아보니 gogs와, gogs에서 파생되어 나온 gitea가 있다. 그런데 gogs는 시놀로지 서버에 설치되므로 gogs로 낙점.
https://www.slant.co/versus/1395/19087/~gogs_vs_gitea


* 속도도 다른 서비스들에 비해 충분히 빠르다.
https://gitbucket.github.io/gitbucket-news/gitbucket/2017/03/29/benchmark-of-gitbucket.html


* gogs 사용을 위해 시놀로지에 git server 설치. 유저는 생성하지 않아도 좋다.
https://www.synology.com/ko-kr/knowledgebase/DSM/help/Git/git


* 시놀로지에 gogs 설치하기
https://kimcblog.com/2018/08/28/%EC%8B%9C%EB%86%80%EB%A1%9C%EC%A7%80synology-nas%EC%97%90-github%EC%B2%98%EB%9F%BC-%EC%9A%B4%EC%9A%A9%ED%95%98%EA%B8%B0-feat-gogs-1-2/

https://kimcblog.com/2018/08/28/%ec%8b%9c%eb%86%80%eb%a1%9c%ec%a7%80synology-nas%ec%97%90-github%ec%b2%98%eb%9f%bc-%ec%9a%b4%ec%9a%a9%ed%95%98%ea%b8%b0-feat-gogs-2-2/


* 패키지 다운로드
https://gogs.io/docs/installation/install_from_binary
- gogs_0.11.86_linux_armv5를 풀어서 1_create_package 안에다 넣는다.

- 인증서에 git.주소 추가후, 역방향프록시 설정.

- 시놀로지에서 데몬 사용자 계정은 무조건 root 이다.


* 파일업로드 제한 풀기
https://dymaxionkim.github.io/beautiful-jekyll/2017-02-06-GOGS/

시놀로지 경로는 /volumeX/@appstore/Gogs/gogs/custom/conf/app.ini


* Windows에서의 git 테스트를 위한 bash 설치
- 프로그램 및 기능 -> windows 기능 켜기/끄기 -> Linux용 Windows 하위 시스템 설치 -> window store에서 win10용 ubuntu 설치.

- 각 폴더에서 바로 실행하기 위해 https://github.com/mintty/wsltty/releases 설치.


* 설치하고나서 알게된 문제
- gogs는 시놀로지에서 root 계정으로밖에 설치할수 없다

- 시놀로지는 DSM 6.0이후로 root의 ssh접속을 금한다

- gogs의 ssh 주소는 루트를 기준으로 만들어지는데 시놀로지에서 유저계정을 만들어서 ssh에 접속해도 결국 루트에 액세스할수 없어 ssh를 사용할 수가 없다. 할수없이 https 주소를 써야한다.

- xcode에서는 gogs의 remote주소를 https://도메인:포트/git주소 로 설정한뒤 로그인하는 방식으로는 인증에 실패한다. https://계정:패스워드@도메인:포트/git주소 로 설정하면 인증을 통과할 수 있다. 이때 계정은 @마크를 쓰는 이메일이 아닌 평문으로 해야 한다.
2019/02/08 00:54 2019/02/08 00:54
Posted
Filed under 개발/그외
MITx: Introduction to Computer Science and Programming - 6.00x
https://www.youtube.com/watch?v=nyX815VByIc&list=PL2fCZiDqOYYVeUQ47xSkwnioVf_xQoQm2

CS50's Understanding Technology
https://www.youtube.com/playlist?list=PLhQjrBD2T382p8amnvUp1rws1p7n7gJ2p


MIT 6.0001 Introduction to Computer Science and Programming in Python, Fall 2016
https://www.youtube.com/watch?v=ytpJdnlu9ug&list=PLUl4u3cNGP63WbdFxL8giv4yhgdMGaZNA

MIT 6.00SC Introduction to Computer Science and Programming, Spring 2011
https://www.youtube.com/watch?v=bX3jvD7XFPs&list=PLB2BE3D6CA77BB8F7
https://ocw.mit.edu/courses/electrical-engineering-and-computer-science/6-00sc-introduction-to-computer-science-and-programming-spring-2011/

Programming Methodology (Stanford)
https://www.youtube.com/watch?v=KkMDCCdjyW8&list=PL84A56BC7F4A1F852

MIT 6.035 Computer Language Engineering, Fall 2005
https://www.youtube.com/watch?v=k-bpyDgBxAo&list=PL0300FE43396456C1

MIT 6.189 Multicore Programming Primer, IAP 2007
https://www.youtube.com/watch?v=vhIwuNJzVG4&list=PLE638294EA3288272

MIT 18.085 Computational Science and Engineering I, Fall 2008
https://www.youtube.com/watch?v=CgfkEUOFAj0&list=PLF706B428FB7BD52C

MIT 6.01SC Introduction to Electrical Engineering and Computer Science I, Spring 2011
https://www.youtube.com/watch?v=3S4cNfl0YF0&index=1&list=PL9B24A6A9D5754E70

MIT 6.042J Mathematics for Computer Science, Fall 2010
https://www.youtube.com/watch?v=L3LMbpZIKhQ&list=PLB7540DEDD482705B

MIT 6.042J Mathematics for Computer Science, Spring 2015
https://www.youtube.com/watch?v=wIq4CssPoO0&list=PLUl4u3cNGP60UlabZBeeqOuoLuj_KNphQ

Programming Abstractions (Stanford)
https://www.youtube.com/watch?v=wmiD5J8Dw9E&index=2&list=PLFE6E58F856038C69
2018/09/11 11:48 2018/09/11 11:48
Posted
Filed under 개발/그외
2018/07/10 00:16 2018/07/10 00:16
Posted
Filed under 개발/그외


2018/07/09 16:49 2018/07/09 16:49
Posted
Filed under 개발/그외
'libpng warning: iCCP: known incorrect sRGB profile' 이 발생하는 이유는 libpng 1.6 이상의 버전에서 기존의 sRGB 프로필에 대해 경고를 토하기 때문이다.
https://wiki.archlinux.org/index.php/Libpng_errors

이 에러를 회피하기 위해서는 png 파일에서 sRGB 프로필을 벗겨내면 되는데, 이를 위해 ImageMagick이라는 프로그램이 존재한다.
http://www.imagemagick.org/script/index.php

설치판을 받아도 되고 포터블판을 받아도 되는데, convert 명령을 다음과 같이 쓰면 프로필을 벗길 수 있다.
convert <in_img> -strip <out_img>

파일이 많은 경우에는 다음 페이지에서와 같이 배치파일을 만들어서 그 디렉토리에서 돌리면 일괄변환을 해 준다.
https://gist.github.com/bluenex/0af2f41fda9954df73a8
2018/07/09 15:33 2018/07/09 15:33
Posted
Filed under 개발/그외
http://bluese05.tistory.com/5

http://brownbears.tistory.com/144

https://stackoverflow.com/questions/576169/understanding-python-super-with-init-methods

https://code.i-harness.com/en/q/8caa9
2018/04/26 15:16 2018/04/26 15:16
Posted
Filed under 개발/Linux
라즈베리파이에서 구동되는 마인크래프트는 화면에 직접 렌더링을 하기 때문에 x윈도우 화면을 받아오는 원격접속으로는 마인크래프트가 실행은 되도 화면이 보이지 않는다.

하지만 다음과 같이 RealVNC에서 설명하는것처럼 라즈비안에서 Vncserver를 설치 후
https://github.com/RealVNC/raspi-preview#optimizingVncViewer

원격 컴퓨터에서 RealVNC로 접속하여
https://www.realvnc.com/en/connect/download/viewer/

라즈비안의 VNC server에서 Enable experimental direct capture mode를 선택하면 화면을 그대로 받아와서 뿌려주게 되므로 원격접속에서도 마인크래프트를 실행시킬 수 있다
https://wikidocs.net/3208

2018/04/14 22:20 2018/04/14 22:20
Posted
Filed under 개발/그외
[code cpp]
#include <stdio.h>

int main()
{
    int (*arr2[]) = {
        (int[]) {0,1,2,3},
        (int[]) {4,5},
        (int[]) {6,7,8}
    };
   
    int row = 0;
    for(int i = 0; i < 4; i++)
    {
        printf("layer1[%d][%d] Address: %p Value: %d\n", row, i, &arr2[row][i], arr2[row][i]);
    }
    printf("\n");
   
    row = 1;
    for(int i = 0; i < 2; i++)
    {
        printf("layer1[%d][%d] Address: %p Value: %d\n", row, i, &arr2[row][i], arr2[row][i]);
    }
    printf("\n");
   
    row = 2;
    for(int i = 0; i < 3; i++)
    {
        printf("layer1[%d][%d] Address: %p Value: %d\n", row, i, &arr2[row][i], arr2[row][i]);
    }
    printf("\n");

    return 0;
}
[/code]
2018/03/24 10:10 2018/03/24 10:10
Posted
Filed under 개발/그외
free함수로 메모리를 해제한 뒤 포인터값을 NULL로 지정하는 기능까지 추가하여 free 함수를 재정의한다.

[code]
#include <stdio.h>

void saferFree(void **pp)
{
    if(pp != NULL && *pp != NULL)
    {
        free(*pp);
        *pp = NULL;
    }
}

#define safeFree(p) saferFree((void**)&(p))

int main()
{
    int *p1;
    p1 = (int *)malloc(sizeof(int));
    *p1 = 5;
    printf("Before: %p\n", p1);
    safeFree(p1);
    printf("After: %p\n", p1);
    safeFree(p1);

    return 0;
}
[/code]
2018/03/23 16:01 2018/03/23 16:01
Posted
Filed under 개발/하드웨어

Specifications

Operating System Genuine Windows® 7 Home Premium
This version contains all product updates (SP1)
Display 12.1" LED Backlight WXGA (1366x768) Screen
CPU AMD® Fusion APU E450 1.65GHz (dual core)/E350 1.6GHz (dual core)/C30 1.2GHz (single core)/C50 1.0GHz (dual core) Processor
Graphic AMD® Radeon HD 6320/AMD® Radeon HD 6310/AMD® Radeon HD 6250*3
Memory DDR3, 2 x SO-DIMM, 2GB/3GB/4GB
Storage 2.5" SATA 250GB/320GB/500GB HDD
Wireless Data Network WLAN 802.11 b/g/n@2.4GHz
Bluetooth V3.0+HS(Optional)
Camera 0.3 M Pixel Camera
Audio Hi-Definition Audio CODEC
Stereo Speakers
High Quality Mic
Interface 1 x VGA Connector
3 x USB 2.0 *2
1 x LAN RJ-45
1 x HDMI
2 x Audio Jack (Headphone/Mic-In)
1 x Card Reader : SD/ SDHC/ SDXC/ MMC
Battery 8 hrs*, 6-Cell 56Wh Li-ion Battery

*Subject to system configuration and usage.
Please visit our web page for more information.
Dimensions 296 x 203 x 38 mm (WxDxH)
Weight 1.45 Kgs (w/ 6cell battery)
Color Matte : Black, Silver
Glossy : Black
Matte & Glossy Mixed : Red
Note *1 : May Vary by SKU and country.
*2 : option:1 x USB3.0 + 2 x USB2.0
*3 : E450:AMD® Radeon HD 6320/E350:AMD® Radeon HD 6310/C50:AMD® Radeon HD 6250

*1215B 리뷰
http://www.minkyoungseop.com/370
http://medialog.bodnara.co.kr/milkblue/?in=medialog_view.html&num=6810

*드라이버 다운로드
http://support.asus.com/download.aspx?SLanguage=en&p=20&s=1&m=Eee%20PC%201215B&os=30&hashedid=5K7QRFbPkwEIa5Uj
http://202.221.139.247/pub/asustw/EeePC/Driver/


2011/09/17 00:05 2011/09/17 00:05
Posted
Filed under 개발/하드웨어
c400이 새로 나온데다 일본에서는 가격차이가 2000엔밖에 없어서 당연히 c400을 살려고 했는데 4k 랜덤리드가 더 느리다는 내용을 얼핏 보아서 이것저것 찾아보았더니 역시 정리해 놓은 사람이 있었다. 개인적인 필요도 있어 번역해 두기로 한다.

출처 : http://surumekuu.blog.shinobi.jp/Entry/98/

구입전 고려사항은 다음과 같습니다.
? C300과 C400의 소비전력
? C300과 C400의 TBW(Total bytes written)에 대해
? C300과 C400의 벤치마크 비교
? C300과 C400의 가격차


◆C300과 C400의 소비전력
노트북에 사용할 용도이므로 25nm와 34nm프로세스의 소비전력차가 신경이 쓰여서 찾아봤습니다.

Intel's second-generation X25-M solid-state drive - The Tech Report - Page 10

Intel's 320 Series solid-state drive - The Tech Report - Page 9
사용자 삽입 이미지
사용자 삽입 이미지

Akiba PC Hotline의 Intel 320 시리즈 [新製品]Intel SSDSA2CW600G3K5 (2011年4月16日) 의 설명에「소비전력은 액티브시 150mW, 아이들시 100mW(510시리즈는 각각380mW、100mW)」라고 되어 있었기 때문에, Crucial SSD에서도 차가 있지 않을까 하고 생각했는데 Crucial RealSSD C300과 C400(m4)의 경우 큰 차이는 없었습니다.

C300과 C400의 TBW(Total bytes written)에 대해
C300을 고른 이유의 하나로 TBW(Total bytes written)의 차가 있습니다.
Micron,25nm世代のNANDフラッシュを載せた高速のSSDを?? - 半導? - Tech-On!
다시쓰기내구성은 TBW(total byte written)환산으로 128G~512G바이트 제품이 72T바이트,64G바이트 제품이 36T바이트이다. 이것은 RealSSD C300과 같은 수치로,「통상 이용조건이라면 충분한 여유가 있다」(Sykes씨)고 한다. 예를들어 TBW가 72T바이트의 경우 매일 40G바이트를 다시 쓰더라도 5년간 사용이 가능하다고 한다.

이 발언, C300과 C400 시리즈 어느쪽도 64GB는 TBW가 36TB 라는것처럼 들리지만 실제로는 이하와 같이 되어 있는 모양입니다. TBW는 36TB라도 충분히 많다고 생각하지만 많으면 많을수록 좋겠지요.

C300 시리즈 Drive Lifetime (Total Bytes Written)
http://download.micron.com/pdf/datasheets/realssd/realssd_c300_2_5.pdf
C300   64/128/256GB  TBW 72TB

C400시리즈
http://www.micron.com/get-document/?documentId=6422&file=realssd_c400v_2_5.pdf
C400v  64GB        TBW 36TB
C400   128/256/512GB TBW  72TB


상기한 각종 데이터들은 2채널에서 퍼왔습니다.
【Crucial】 Real SSD C300/C400 Part10 【Micron】/日刊?自作PC

또한 SSD의 수명에 대해서는 이들 레포트를 읽었으므로 안심하고 있습니다.
そろそろSSDの?命報告が殺到する頃じゃないのか 【2ちゃんねる/自作PC板】
SSD耐久テスト

◆C300과 C400의 벤치마크 비교
RealSSD C400/Crucial m4 SSDをテスト:WinPCレビュ?
SSD를 사용하는 용도가 파일보존용이라면 SequentialRead、Wait(시퀀셜 리드)의 속도가 빠른 C400이 쾌적할테지만 시스템드라이브로 쓸거라면 RandamRead 성능이 중요합니다. 그 점에서 C300이 C400보다 RandomRead 4K와 4KQD32를 읽어들이는 속도가 빠르게 되어있습니다.

【Crucial】 Real SSD C300/C400 Part10 【Micron】/日刊?自作PC
조사해보면 역시 현재는 C300이 더 나은거 아닌가 하는 의견이 보이고 있습니다.

◆C300과 C400의 가격차
Micron Technology RealSSD C400 64GB (MTFDDAC064MAM-1J1)
Micron Technology RealSSD C400 64GB (MTFDDAC064MAM-1J1)|?格比較サイト [coneco.net] コネコネット
최저가    ¥12,980    1GB당:¥202.8  가격대:¥12,980~¥13,980

Crucial RealSSD C300 64GB (CTFDDAC064MAG-1G1)
Crucial RealSSD C300 64GB (CTFDDAC064MAG-1G1)|?格比較サイト [coneco.net] コネコネット
최저가    ¥10,450    1GB당:¥163.3  가격대:¥10,450~¥16,801

C300과 C400의 가격차는 최저가로 약 2500엔의 차가 있지만 2000엔 정도라면 안정된 것을 고르는 편이 좋을 것 같습니다.

◆그 외 정보

정보를 찾으러 간 2채널 스레는 ガチフリ?プチフリ 문제로 떠들고 있습니다. 스레를 읽어보면 진짜로 プチフリ인가, 아니면 특정조건에 의한건가를 단정할 수 없다는 모양. IRST의 버전을 바꾸거나 LPM(Link Power Management)을 무효로 하면 개선된다는 얘기나 개선되지 않는다는 등의 정보가 섞어있습니다.

【Crucial】 Real SSD C300/C400 Part11 【Micron】
http://hibari.2ch.net/test/read.cgi/jisaku/1301831568/

결론
여기저기 리뷰를 보면 쓰여있지만 C400의 펌웨어가 안정되면 C300보다 좋아질 지도 모르겠습니다. 현 상태(2011/4/22)라면 TWB의 양도 생각해 C300이 좋겠다고 판단했습니다.
2011/04/28 23:15 2011/04/28 23:15
Posted
Filed under 개발/하드웨어
출처 : http://support.acer.com/acerpanam/netbook/2011/Acer/Aspire/AspireOneAO522/AspireOneAO522sp2.shtml

드라이버 다운로드는 이곳
https://support.acer.com/us/en/product/default.aspx?modelId=3492

Acer Aspier One AO522 Series Netbook Specifications

Part Number: AspireOneAO522 Acer Aspire One AO522 Series Netbook

FeatureDescription
Operating System1 Genuine Windows® 7 Starter
Processor / Speed1 AMD C-Series processor C-50 (1 MB L2 cache, 1 GHz, DDR3 1066 MHz, 9 W)
Core Logic Chipset1 AMD A50M Fusion™ Controller Hub
System memory1, 3, Dual-channel DDR3 SDRAM support with one soDIMM module4
  • Up to 1 GB of DDR3 system memory (for Windows® 7 Starter for small notebook PCs)
  • Up to 2 GB of DDR3 system memory (for other operating systems)
Display1 10.1" HD 1280 x 720 (WXGA) resolution, high-brightness (200-nit) LED-backlit TFT LCD
Mercury free, environment friendly
Graphics ATI Radeon™ HD 6250 Graphics with 256 MB of dedicated system memory, supporting Unified Video Decoder 3 (UVD3), OpenCL® 1.1, OpenGL® 3.1, OpenEXR High Dynamic-Range (HDR) technology, Shader Model 5.0, Microsoft® DirectX® 11
Dual independent display support
16.7 million colors
External resolution / refresh rates5:
  • VGA port up to 1920 x 1200: 60 Hz
  • HDMI™ port up to 1920 x 1080: 60 Hz
MPEG-2/DVD decoding
WMV9 (VC-1) and H.264 (AVC) decoding
HDMI™ (High-Definition Multimedia Interface) with HDCP (High-bandwidth Digital Content Protection) support
Audio High-definition audio support
One built-in mono speaker
MS-Sound compatible
Built-in digital microphone
Storage Hard disk drive
  • 2.5" (9.5 mm) 160/250 GB1, 6,
Multi-in-1 card reader, supporting:
  • Secure Digital™ (SD) Card, MultiMediaCard™ (MMC), Memory Stick™ (MS), Memory Stick PRO™ (MS PRO), xD-Picture Card™ (xD)
  • Storage cards with adapter: miniSD™, microSD™, Memory Stick Duo™, Reduced-Size Multimedia Card (RS-MMC), Memory Stick PRO Duo™
Communication Webcam
Acer Video Conference1, featuring:
  • Acer Crystal Eye webcam with 1280 x 1024 resolution
  • Acer Video Conference Manager software, featuring Video Quality Enhancement (VQE) technology, supporting 640 x 480 resolution online video calls7
Wireless and networking
WLAN1, 8, 9,:
  • Acer InviLink™ Nplify™ 802.11b/g/n Wi-Fi CERTIFIED™
  • Supporting Acer SignalUp™ wireless technology
WPAN1: Bluetooth® 3.0+HS
WWAN1, 8,: UMTS/HSPA at 850/900/1900/2100 MHz and quad-band GSM/GPRS/EDGE at 850/900/1800/1900 MHz, upgradable to 7.2 Mb/s HSDPA and 5.7 Mb/s HSUPA (for 3G model)
LAN: Fast Ethernet
Input and Control 84-/85-/88-key Acer FineTip keyboard, 93% of full-size keyboard, with international language support
Multi-gesture touchpad, supporting two-finger scroll, pinch, rotate, flip
I/O Ports Multi-in-1 card reader
Three USB 2.0 ports
HDMI™ port with HDCP support
External display (VGA) port
Headphone/speaker/line-out jack
Microphone-in jack
Ethernet (RJ-45) port
DC-in jack for AC adapter
Software11 Productivity
  • Acer ePower Management
  • Acer eRecovery Management
  • Adobe® Flash® Player 10.1
  • Adobe® Reader® 9.1
  • eSobi™
  • Barnes & Noble Desktop Reader
  • Bing™ Bar
  • Microsoft® Office 2010 preloaded (purchase a product key to activate)12
  • Microsoft® Office Starter 201013
  • New York Times Reader
  • Norton™ Online Backup
Security
  • McAfee® Internet Security Suite Trial14
  • MyWinLocker®
Gaming
  • WildTangent®1
Communication and ISP
  • Acer Crystal Eye
  • Acer Video Conference Manager1
  • Microsoft® Silverlight™
  • Skype™
  • Windows Live™ Essentials
Utilities and tools
  • Acer Identity Card
  • Acer Registration
  • Acer Updater
  • Customized Internet Explorer® 8
  • eBay® shortcut 2009
  • Netflix shortcut
Dimensions / Weight 10.17 (W) x 7.28 (D) x 1.01 (H) mm (258.5 x 185 x 25.7 inches)
2.87 lbs. (1.30 kg)2 with 6-cell battery pack
2.65 lbs. (1.20 kg)2 with 3-cell battery pack
Power adapter and battery1 Product Safety Electric Appliance and Materials (PSE) certified for battery pack
2-pin 40 W Acer MiniGo AC adapter:
  • 3.66 (W) x 1.26 (D) x 1.67 (H) inches (93.2 x 32.2 x 42.5 mm)
  • 0.39 lbs. (180 g)2 with 250 cm DC cable
Battery
  • 24.4 W 2200 mAh 3-cell Li-ion battery pack
  • 48 W 4400 mAh 6-cell Li-ion battery pack
Battery life: 3 hours10 with 3-cell battery pack, 6 hours10 with 6-cell battery pack
Color options Diamond Black
Eco Standards ENERGY STAR®
WEEE
RoHS
Mercury free
  1. Specifications vary depending on model.
  2. Weight may vary depending on product configuration, vendor components, manufacturing variability, and selected options.
  3. Shared system memory may be allocated to support graphics, depending on system memory size and other factors. Actual system memory available to the operating system will be reduced by any memory used by the graphics solution and resources required by the operating environment.
  4. This system is bundled with DDR3 1066 MHz memory; however, memory speed may vary depending on CPU/chipset support.
  5. Resolution/refresh rates depend on display capability and color/depth settings.
  6. 1 GB is 1 billion bytes. Actual formatted capacity is less and may vary depending on preloaded materials and operating environment. Acer eRecovery Management utilizes up to 10 GB of the stated hard disk capacity as dedicated backup space.
  7. Two VQE-enabled Acer notebooks with dual-core processors are required to enjoy the exclusive benefits and added performance of VQE.
  8. Actual throughput may vary depending on network conditions and environmental factors such as network traffic or overhead, building construction, and access point settings.
  9. Acer Nplify™, a high-throughput wireless solution, delivers superior performance and reliable connections while enabling emerging voice, video and data applications. Wi-Fi CERTIFIED™, it supports Acer SignalUp™ wireless technology and is compliant with 802.11a/b/g/n and 802.11b/g standards.
  10. The listed battery life is based on MobileMark 2007® productivity mode testing with wireless on. Details of MobileMark2007® testing are available at www.bapco.com. Battery life rating is for comparison purposes only. Actual battery life varies by model, configuration, applications, power management settings, operating conditions, and utilized features. A battery's maximum capacity decreases with time and use.
  11. Bundled software may vary depending on hardware configuration, OS and regional availability.
  12. Purchase an Office 2010 product key to activate one of the following Office 2010 suites preloaded on this PC: Office Home and Student 2010, Office Home and Business 2010, Office Professional 2010.
  13. Includes Microsoft® Office 2010 preloaded. Purchase a product key to activate a full Microsoft Office 2010 suite. This PC is preloaded with reduced-functionality versions of Word and Excel that include advertising. PowerPoint, Outlook and Publisher are not included.
  14. Trial periods vary depending on the geographic region and specifications: 365-day trial for China, Taiwan, Hong Kong and Singapore (Simplified Chinese and Traditional Chinese OS models); 60-day trial for other regions.


2011/04/13 10:31 2011/04/13 10:31
Posted
Filed under 개발/하드웨어
*링크스테이션 듀오(LS-WXL/E) 공식 페이지
http://buffalotech.co.kr/product/01_linkstation/01_product_linkstation.htm?pkey=141


*LS-WXL/E 리뷰
http://offree.net/entry/Buffalo-NAS-LS-WXL-E-Review


*한글 메뉴얼
ftp://buffalokorea.dyndns.org/array1/buffalo/buffalo%20server/Storage/LinkStation/manual/LinkStation_manual_05.pdf


*최신 펌웨어(1.68), NASNavigator 다운로드
http://buffalo.jp/support_ap/support/products/ls_wxl.html


*드라이브 구성에 대해
http://buffalotech2.cafe24.com/customer/qna/qna_view.htm?tb=Qna&type=1&pkey=18059&page=65


*셋업메뉴 설명
http://blog.naver.com/cosmogony/100102503656


*ddns, 포트포워딩 세팅법
http://blog.naver.com/fan2zone/114443652
http://blog.naver.com/fan2zone/114449787


*FTP세팅법
http://buffalotech2.cafe24.com/customer/faq/faq_view.htm?tb=Faq&type=5&pkey=239&page=2


*NAS를 일반 드라이브로 인식하기
http://archvista.net/entry/%EB%84%A4%ED%8A%B8%EC%9B%8C%ED%81%AC-%EB%93%9C%EB%9D%BC%EC%9D%B4%EB%B8%8C-%EC%97%B0%EA%B2%B0-FTP-%EC%82%AC%EC%9D%B4%ED%8A%B8-%EC%B6%94%EA%B0%80%ED%95%98%EA%B8%B0
http://ahura.co.kr/102
http://andromedarabbit.net/wp/ftp_using_network_drive/


*루트획득
http://redcroix.tistory.com/121
http://offree.net/entry/Buffalo-Linkstation-Root-Login


*TFTP Boot recovery
ftp://24.153.165.234/array1/share/nas-recovery/


*이상동작시 강제 펌웨어 업데이트
http://forum.buffalo.nas-central.org/viewtopic.php?f=39&t=21159
http://forums.buffalotech.com/t5/Solved-Storage-Threads/cannot-update-firmware-stuck-in-EM-mode/td-p/23480


*2ch 링크스테이션 게시판
http://logsoku.com/search.php?query=BUFFALO+Link+Station&category=&order=desc&sort=lastwrite
2011/04/11 10:30 2011/04/11 10:30
Posted
Filed under 개발/Linux
어제 무슨 블로그 평가하는데서 블로그를 평가해 봤는데

www.silphion.net

silphion.net

이 서로 다른 두 개의 사이트인것으로 인식되니 하나로 통합하라는 지적을 받았다.

이렇게 쓰면 트래픽이 분산이 되서 좋지 않다나? 나는 어차피 이 도메인 속에서 다른 서비스를 돌릴 계획이 없으니 앞에 www.를 붙이지 않는 깔끔한 쪽으로 간 거였는데 실제 검색엔진에서는 www.silphion.net 도 잡고 silphion.net 도 잡고 있었다는 것이다.

그런 이유로 www.silphion.net 로 온 트래픽을 silphion.net 으로 돌려주는 301 redirect 법을 소개. 트래픽을 넘기는 법은 여러가지가 있을 수 있는데 검색엔진이 추천하는 301 redirect는 다음과 같은 방식으로 한다.
다음에 소개하는 행을 루트에 있는 .htaccess 파일에 써 넣으면 된다. 위치는 어디라도 상관없는 듯.


    * 「www.없음」으로 통일할 때

      Options +FollowSymLinks
      RewriteEngine on
      RewriteCond %{HTTP_HOST} ^www.sample\.com
      RewriteRule ^(.*)$ http://sample.com/$1 [R=301,L]

    * 「www.」으로 통일할 때

      Options +FollowSymLinks
      RewriteEngine on
      RewriteCond %{HTTP_HOST} ^sample\.com
      RewriteRule ^(.*)$ http://www.sample.com/$1 [R=301,L]


출처 :

301リダイレクトを使った「WWWあり」と「WWWなし」の統一

2011/01/12 15:11 2011/01/12 15:11
도프

좋은 방법이네요! 혹시 www안붙은 도메인을 www로 연결되게 하는방법과 서브도메인 (예를들면 .net을 .com으로 이동시키는 방법)을 같이 구현할수없을까요?

클리아르

글쎄요.. 퍼온거라 그 부분까지는 잘 모르겠네요. 죄송합니다.

Posted
Filed under 개발/Linux

출처 : rain9.com

필요한 파일이 robots.txt라는 조그마한 텍스트 파일입니다. 정리하면 robots.txt파일을 생성해야 하는 이유는 크게 두가지입니다. 트래픽을 조절할 수 있다는 것과 다른 사람에게 알리고 싶지 않는 정보를 보호하기 위해서 입니다. 이 파일의 역할을 당신의 블로그를 방문하는 로봇들에게 사이트를 검색하게 허용할 것인지, 허용한다면 어떤 로봇에게, 어떤 디렉토리를 허용할지를 담고 있는 파일입니다.

윈도우의 경우 메모장을 이용해서 생성하면 되는데요, 파일은 반드시 계정의 최상위(root) 디렉토리에 있어야 합니다. 이를테면 제 사이트 http://bklove.info/ 라면 http://bklove.info/robots.txt 에 위치해야 합니다. http://bklove.info/temp/robots.txt  라면 제대로 작동하지 않습니다.

파일의 내용은 크게 세 부분으로 나뉩니다.
주석(#), 로봇의 이름을 적는 부분(User-agent) , 방문을 허용하지 않을 디렉토리를 적는 부분(Disallow)으로 구분됩니다.

User-agent: *
Disallow: /

위처럼 적으면 모든 로봇에서 모든 디렉토리에 대한 검색을 불가능하게 하겠다는 뜻을 담고 있습니다. [*]는 User-agent에서만 사용가능한데 [모든 로봇]이라는 뜻을 지니고 있습니다. Disallow의 [/]는 디렉토리에 있는 모든 폴더를 나타내는 것이구요.

만약 특정 디렉토리를 차단하게 하려면 다음과 같이 적어주면 됩니다.

User-agent: *
Disallow: /blog

위는 모든 로봇[*]에게 [blog]디렉토리 아래에 있는 부분에 대해서는 접근을 차단한다는 내용을 담고 있습니다.

그렇다면 특정 로봇을 차단하는 방법은 어떤게 있을까요? 이를테면 사이트에서 네이버의 로봇이 활동하게 하지 못하는 방법은 다음과 같습니다.

User-agent: Cowbot
Disallow: /

Cowbot은 네이버 로봇의 이름입니다. 위처럼 작성해주시면 네이버 로봇의 경우 검색을 하지 못하게 됩니다.

조금 복잡하게 구글과 네이버는 허용하고, 그외에는 모두 차단하는 방법은 다음과 같습니다.

User-agent: Cowbot
Disallow:

User-agent: Googlebot
Disallow:

User-agent: *
Disallow: /

Disallow에 아무적도 적지 않으면 모두 허용한다는 의미가 되기 때문이죠.
/blog와 /blog/는 조금 다릅니다.
/blog의 경우는 /blog/a.htm와 /blog.htm에 대해서 불가능한 것이고
/blog/의 경우는 /blog/a.htm에 대해서만 불가능 합니다.
즉 /blog는 디렉토리와 파일까지도 포함하고, /blog/는 디렉토리만을 의미하거든요.


앞 서 트래픽을 아끼기 위해서 이미지 로봇을 차단하는 방법은 다음과 같습니다. 참고로 원래는 Disallow항목에 *표시를 넣을 수 없습니다. 이 명령어는 구글과 MSN등에서만 통용되구요. 파일명 뒤에 반드시 $표시를 해주셔야 합니다. 즉 모든 검색엔진에서 통용되지는 않습니다.

User-agent: Googlebot-Image
Disallow: /*.gif$
Disallow: /*.jpg$

위 문장은 구글의 이미지를 검색하는 로봇에게 gif와 jpg로 된 이미지를 모두 검색하지 않도록 하는 명령어입니다.

참고로 주석문을 작성하기 위해서는 앞에 #를 적어주시면 됩니다. 로봇의 이름은 개별 검색사이트를 방문하셔서 아셔야 합니다. 주로 쓰는 로봇의 이름만 알려드리면...
구글: Googlebot
구글 이미지 : googlebot-image
네이버 : cowbot
야후 : Slurp
야후 이미지 : Yahoo-MMCrawler
엠파스봇 : empas
MSN : MSNBot
첫눈: 1Noonbot 1.0


차단했을 경우에, 즉시 삭제되는 것은 아니지만 시간이 지나면 검색포털에서의 검색 결과 역시 삭제된다는 사실을 염두에 두셔야 합니다.


* Crawl-Delay 항목을 지정하시면 검색엔진의 방문을 지연시킬 수 있습니다. 기본단위는 초단위입니다. 아래의 명령어 역시 위의 *.jpg$처럼 야후, MSN에서만 작동됩니다.

User-agent: Slurp
Crawl-delay: 20

이렇게 하시면, 모든 검색로봇의 방문을 허용하되 5초동안은 다시 방문을 하지 않도록 지정하게 됩니다.** http://www.mcanerin.com/EN/search-engine/robots-txt.asp  이곳에 가시면.. 비록 외국 사이트긴 하지만.. robots.txt를 제작해줍니다. ^^!! 고르기만 하면 자동으로 파일을 생성해주죠. 가져와서 메모장에 붙여놓고 저장후 FTP로 올리면 됩니다.
***
http://tool.motoricerca.info/robots-checker.phtml 이곳은 만들어진 robots.txt파일이 잘 작성되었는지 검사해주는 사이트입니다.

**** 끝으로 제가 사용하고 있는 robots.txt는 http://bklove.info/robots.txt  여기서 확인이 가능합니다. 야후의 경우 시간을 지연시키는 명령어를 사용했고, 구글과 구글이미지, MSN의 경우 이미지와 PDF, ZIP, PPT파일에 대한 검색을 차단했습니다.

http://cafe.naver.com/nanospeed.cafe?iframe_url=/ArticleRead.nhn%3Farticleid=188
네이버 [robots.txt]이용 검색로봇 차단 가이드 검색 카페 최상위 글

2008/12/20 13:35 2008/12/20 13:35